Server REST con esp8266 e esp32: POST PUT PATCH DELETE – Parte 3
Negli articoli precedenti abbiamo spiegato in dettaglio il verbo GET, ma quando vuoi creare qualcosa devi (puoi?) usare il verbo POST.
Ad esempio, se si desidera creare un elemento come aggiungere una nuova stanza in modo da iniziare a gestire ulteriori dati, è necessario eseguire una POST.
Puoi inviare i dati tramite POST con molti formati, ma quello standard è il formato JSON.
La struttura dello sketch è la stessa dell’altro, ma è necessario impostare il verbo corretto:
server.on(F("/setRoom"), HTTP_POST, setRoom);
E puoi recuperare il contenuto passato nel corpo della POST con questo comando:
String postBody = server.arg("plain");
quando hai recuperato il contenuto, poi ovviamente devi parsarlo. (Per informazioni più dettagliate fai riferimento all’articolo “Gestire file JSON con Arduino, esp32 ed esp8266“)
	DynamicJsonDocument doc(512);
	DeserializationError error = deserializeJson(doc, postBody);
	JsonObject postObj = doc.as<JsonObject>();
Ed ecco qui lo sketch completo
Per l’esp32 devi modificare questi header
#include <ESP8266WiFi.h>
#include <ESP8266WebServer.h>
#include <ESP8266mDNS.h>
a
#include <WiFi.h>
#include <WebServer.h>
#include <ESPmDNS.h>
/*
 * 	Json parametric POST REST request with ArduinoJSON library
  *  by Mischianti Renzo <https://mischianti.org>
 *
 *  https://mischianti.org/
 *
 */

#include "Arduino.h"
#include <ESP8266WiFi.h>
#include <WiFiClient.h>
#include <ESP8266WebServer.h>
#include <ESP8266mDNS.h>
#include <ArduinoJson.h>

const char* ssid = "<YOUR-SSID>";
const char* password = "<YOUR-PASSWD>";

ESP8266WebServer server(80);

// Serving Hello world
void setRoom() {
	String postBody = server.arg("plain");
	Serial.println(postBody);

	DynamicJsonDocument doc(512);
	DeserializationError error = deserializeJson(doc, postBody);
	if (error) {
		// if the file didn't open, print an error:
		Serial.print(F("Error parsing JSON "));
		Serial.println(error.c_str());

		String msg = error.c_str();

		server.send(400, F("text/html"),
				"Error in parsin json body! <br>" + msg);

	} else {
		JsonObject postObj = doc.as<JsonObject>();

		Serial.print(F("HTTP Method: "));
		Serial.println(server.method());

		if (server.method() == HTTP_POST) {
			if (postObj.containsKey("name") && postObj.containsKey("type")) {

				Serial.println(F("done."));

				// Here store data or doing operation


				// Create the response
				// To get the status of the result you can get the http status so
				// this part can be unusefully
				DynamicJsonDocument doc(512);
				doc["status"] = "OK";

				Serial.print(F("Stream..."));
				String buf;
				serializeJson(doc, buf);

				server.send(201, F("application/json"), buf);
				Serial.print(F("done."));

			}else {
				DynamicJsonDocument doc(512);
				doc["status"] = "KO";
				doc["message"] = F("No data found, or incorrect!");

				Serial.print(F("Stream..."));
				String buf;
				serializeJson(doc, buf);

				server.send(400, F("application/json"), buf);
				Serial.print(F("done."));
			}
		}
	}
}


// Define routing
void restServerRouting() {
    server.on("/", HTTP_GET, []() {
    	server.send(200, F("text/html"),
            F("Welcome to the REST Web Server"));
    });
    // handle post request
    server.on(F("/setRoom"), HTTP_POST, setRoom);
}

// Manage not found URL
void handleNotFound() {
  String message = "File Not Found\n\n";
  message += "URI: ";
  message += server.uri();
  message += "\nMethod: ";
  message += (server.method() == HTTP_GET) ? "GET" : "POST";
  message += "\nArguments: ";
  message += server.args();
  message += "\n";
  for (uint8_t i = 0; i < server.args(); i++) {
    message += " " + server.argName(i) + ": " + server.arg(i) + "\n";
  }
  server.send(404, "text/plain", message);
}

void setup(void) {
  Serial.begin(115200);
  WiFi.mode(WIFI_STA);
  WiFi.begin(ssid, password);
  Serial.println("");

  // Wait for connection
  while (WiFi.status() != WL_CONNECTED) {
    delay(500);
    Serial.print(".");
  }
  Serial.println("");
  Serial.print("Connected to ");
  Serial.println(ssid);
  Serial.print("IP address: ");
  Serial.println(WiFi.localIP());

  // Activate mDNS this is used to be able to connect to the server
  // with local DNS hostmane esp8266.local
  if (MDNS.begin("esp8266")) {
    Serial.println("MDNS responder started");
  }

  // Set server routing
  restServerRouting();
  // Set not found response
  server.onNotFound(handleNotFound);
  // Start server
  server.begin();
  Serial.println("HTTP server started");
}

void loop(void) {
  server.handleClient();
}
Per eseguire un semplice test puoi utilizzare, come descritto, un programma come Postman dove andrai a creare una richiesta POST
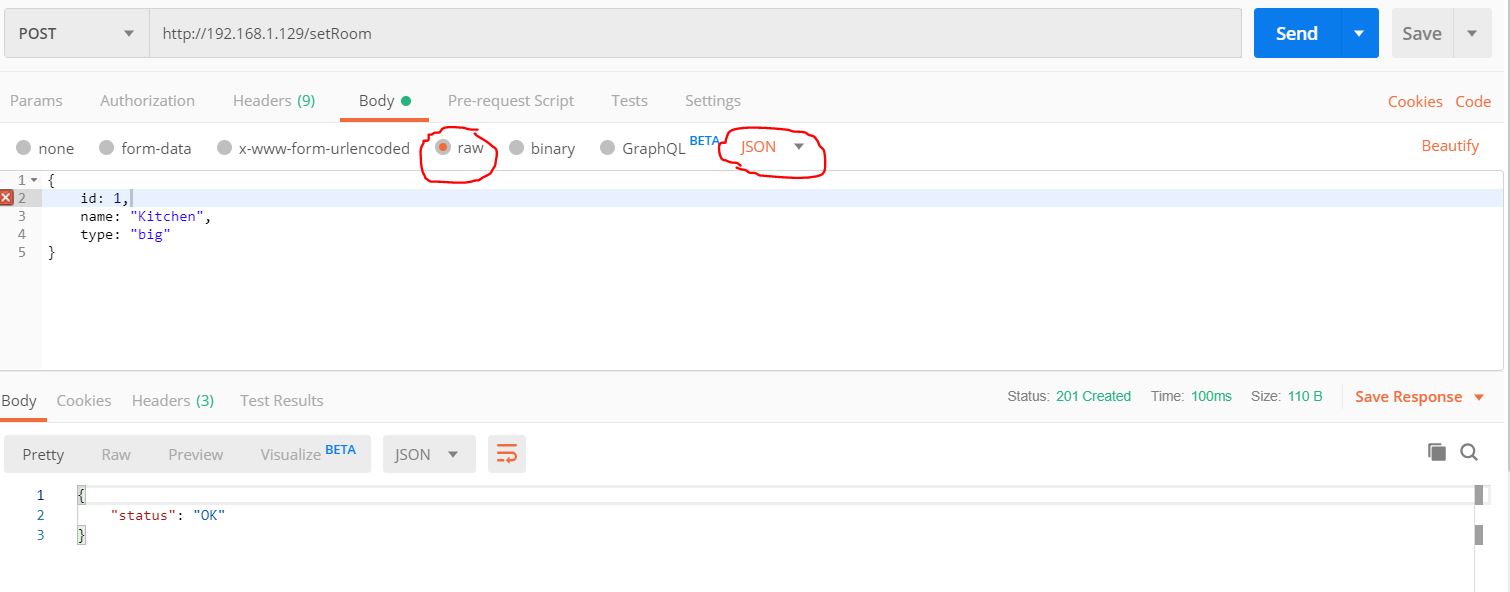
Come puoi vedere, specifichiamo un corpo RAW (non elaborato) in formato JSON e riceviamo uno stato 201 (Creato per simulare un’aggiunta di una stanza nel database) e una risposta JSON con attributo status “OK”.
Sull’output seriale puoi vedere il valore passato per posta.
Solo come esercizio, controllo il nome e il tipo dell’attributo
if (postObj.containsKey("name") && postObj.containsKey("type")) {
se uno di questi non è presente, inviamo una risposta con 400 come codice di stato (Nessun dato trovato o errato!) e un messaggio di dettaglio.
{
    "status": "KO",
    "message": "No data found, or incorrect!"
}
Tutti gli altri verbi
Tutti gli altri verbi hanno lo stesso comportamento della POST, l’unica differenza è logica con cui vengono utilizzati, è necessario utilizzare il verbo corretto per l’operazione corretta.
Per cambiare verbo devi sostituirlo sulla riga dove è impostato il server in ascolto
server.on(F("/room"), HTTP_DELETE, room);
e
if (server.method() == HTTP_DELETE) {
Best practices
In un server Rest una best practices è fare un end point (per esempio /room) e usare il verbo per l’operazione specifica.
Nell’esempio che uso /setRoom per affettuare l’aggiunta di una camera, questo, è tecnicamente corretto ma logicamente errato.
L’end point corretto è /room, e dovresti usare:
- POST: per aggiungere una nuova stanza;
- GET: per ottenere una stanza;
- DELETE: per eliminare la stanza;
- e così via.
Grazie
- Server REST su esp8266 o esp32: introduzione
- Server REST su esp8266 o esp32: GET e formattazione JSON
- Server REST su esp8266 o esp32: POST, PUT, PATCH, DELETE
- Server REST su esp8266 o esp32: richieste CORS, OPTION e GET
- Server REST su esp8266 o esp32: richieste CORS, OPTION e POST