Server REST su esp8266 o esp32: GET e formattazione JSON – Part 2
Per fare una GET non serve altro che il browser, ma per operazioni più complesse è necessario scaricare un programma per testare i vari verbi REST.
Uso spesso WeMos D1 mini, esp8266 piccolo e semplice.
Lo puoi trovare qui WeMos D1 mini - NodeMCU V2 V2.1 V3 - esp01 - esp01 programmer
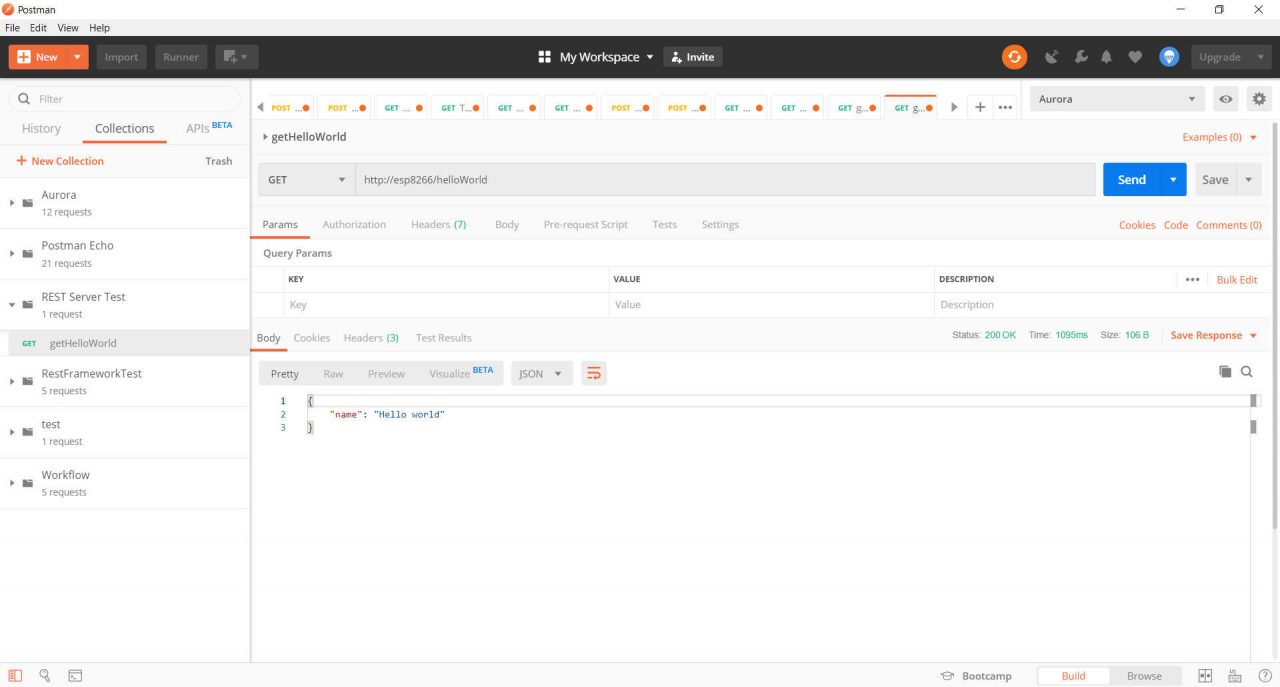
Scaricheremo un client come Postman è semplice e potente.
Dopo aver scaricato il client faie clic sul pulsante Import, selezionare Import From Link ed inserire questo
https://www.getpostman.com/collections/bbb190822fed3f3b881d
Ora avrai a disposizione una nuova raccolta di API REST che utilizzeremo per testare il nostro lavoro.
Dopo aver uploadato il servizio dell’articolo precedente, seleziona getHelloWorld e fai clic Send. Se non funziona, controlla il nome o l’IP del tuo dispositivo.
GET
Naturalmente inizieremo con un esempio di GET, questo è il verbo più semplice, viene utilizzato da tutti i browser per recuperare le pagine HTML.
Per l’esp32 devi modificare questi header
#include <ESP8266WiFi.h>
#include <ESP8266WebServer.h>
#include <ESP8266mDNS.h>
a
#include <WiFi.h>
#include <WebServer.h>
#include <ESPmDNS.h>
In un server REST questo verbo viene normalmente utilizzato per recuperare dati come un elenco di elementi o un elemento.
Puoi passare un parametro tramite querystring, in pratica aggiungi coppie chiave, valore sull’URL dopo un ?e separate tramite un carattere &.
Per esempio settings?signalStrength=true&chipInfo=true&freeHeap=true.
Andremo a fare un semplice esempio di come sia possibile filtrare il tipo di informazioni da mostrare.
Evidenziero il codice aggiunto all’esempio precedente.
/*
 * 	Json parametric GET REST response
  *  by Mischianti Renzo <https://mischianti.org>
 *
 *  https://mischianti.org/
 *
 */

#include "Arduino.h"
#include <ESP8266WiFi.h>
#include <WiFiClient.h>
#include <ESP8266WebServer.h>
#include <ESP8266mDNS.h>

const char* ssid = "<YOUR-SSID>";
const char* password = "<YOUR-PASSWD>";

ESP8266WebServer server(80);

// Serving Hello world
void getHelloWord() {
	server.send(200, "text/json", "{\"name\": \"Hello world\"}");
}
// Serving Hello world
void getSettings() {
	String response = "{";

	response+= "\"ip\": \""+WiFi.localIP().toString()+"\"";
	response+= ",\"gw\": \""+WiFi.gatewayIP().toString()+"\"";
	response+= ",\"nm\": \""+WiFi.subnetMask().toString()+"\"";

	if (server.arg("signalStrength")== "true"){
		response+= ",\"signalStrengh\": \""+String(WiFi.RSSI())+"\"";
	}

	if (server.arg("chipInfo")== "true"){
		response+= ",\"chipId\": \""+String(ESP.getChipId())+"\"";
		response+= ",\"flashChipId\": \""+String(ESP.getFlashChipId())+"\"";
		response+= ",\"flashChipSize\": \""+String(ESP.getFlashChipSize())+"\"";
		response+= ",\"flashChipRealSize\": \""+String(ESP.getFlashChipRealSize())+"\"";
	}
	if (server.arg("freeHeap")== "true"){
		response+= ",\"freeHeap\": \""+String(ESP.getFreeHeap())+"\"";
	}
	response+="}";

	server.send(200, "text/json", response);
}

// Define routing
void restServerRouting() {
    server.on("/", HTTP_GET, []() {
    	server.send(200, F("text/html"),
            F("Welcome to the REST Web Server"));
    });
    server.on(F("/helloWorld"), HTTP_GET, getHelloWord);
    server.on(F("/settings"), HTTP_GET, getSettings);
}

// Manage not found URL
void handleNotFound() {
  String message = "File Not Found\n\n";
  message += "URI: ";
  message += server.uri();
  message += "\nMethod: ";
  message += (server.method() == HTTP_GET) ? "GET" : "POST";
  message += "\nArguments: ";
  message += server.args();
  message += "\n";
  for (uint8_t i = 0; i < server.args(); i++) {
    message += " " + server.argName(i) + ": " + server.arg(i) + "\n";
  }
  server.send(404, "text/plain", message);
}

void setup(void) {
  Serial.begin(115200);
  WiFi.mode(WIFI_STA);
  WiFi.begin(ssid, password);
  Serial.println("");

  // Wait for connection
  while (WiFi.status() != WL_CONNECTED) {
    delay(500);
    Serial.print(".");
  }
  Serial.println("");
  Serial.print("Connected to ");
  Serial.println(ssid);
  Serial.print("IP address: ");
  Serial.println(WiFi.localIP());

  // Activate mDNS this is used to be able to connect to the server
  // with local DNS hostmane esp8266.local
  if (MDNS.begin("esp8266")) {
    Serial.println("MDNS responder started");
  }

  // Set server routing
  restServerRouting();
  // Set not found response
  server.onNotFound(handleNotFound);
  // Start server
  server.begin();
  Serial.println("HTTP server started");
}

void loop(void) {
  server.handleClient();
}
Come puoi vedere, ho impostato tramite querystring 3 parametri, e li recupererà con il metodo arg del server.
	if (server.arg("signalStrength")== "true"){
		response+= ",\"signalStrengh\": \""+String(WiFi.RSSI())+"\"";
	}
Se non presente, il risultato di arg sarà un valore null in modo da poter anche omettere il parametro:
http://esp8266/settings?freeHeap=true
http://esp8266/settings?signalStrength=false&chipInfo=false&freeHeap=true
Per com’è scritto il codice le due URL sopra hanno lo stesso risultato.
Libreria Arduino JSON
Scrivere JSON con stringhe è molto noioso, quindi è meglio e sicuramente più elegante usare una libreria. Esiste una libreria standard de facto su cui ho scritto un articolo “Gestire file JSON con Arduino ed esp8266“.
Perciò andremo a riscrivere lo sketch.
/*
 * 	Json parametric GET REST response with ArduinoJSON library
  *  by Mischianti Renzo <https://mischianti.org>
 *
 *  https://mischianti.org/
 *
 */

#include "Arduino.h"
#include <ESP8266WiFi.h>
#include <WiFiClient.h>
#include <ESP8266WebServer.h>
#include <ESP8266mDNS.h>
#include <ArduinoJson.h>

const char* ssid = "<YOUR-SSID>";
const char* password = "<YOUR-PASSWD>";

ESP8266WebServer server(80);

// Serving Hello world
void getHelloWord() {
	  DynamicJsonDocument doc(512);
	  doc["name"] = "Hello world";

	  Serial.print(F("Stream..."));
	  String buf;
	  serializeJson(doc, buf);
	  server.send(200, "application/json", buf);
	  Serial.print(F("done."));
}
// Serving Hello world
void getSettings() {
	  // Allocate a temporary JsonDocument
	  // Don't forget to change the capacity to match your requirements.
	  // Use arduinojson.org/v6/assistant to compute the capacity.
	//  StaticJsonDocument<512> doc;
	  // You can use DynamicJsonDocument as well
	  DynamicJsonDocument doc(512);

	  doc["ip"] = WiFi.localIP().toString();
	  doc["gw"] = WiFi.gatewayIP().toString();
	  doc["nm"] = WiFi.subnetMask().toString();

	  if (server.arg("signalStrength")== "true"){
		  doc["signalStrengh"] = WiFi.RSSI();
	  }

	  if (server.arg("chipInfo")== "true"){
		  doc["chipId"] = ESP.getChipId();
		  doc["flashChipId"] = ESP.getFlashChipId();
		  doc["flashChipSize"] = ESP.getFlashChipSize();
		  doc["flashChipRealSize"] = ESP.getFlashChipRealSize();
	  }
	  if (server.arg("freeHeap")== "true"){
		  doc["freeHeap"] = ESP.getFreeHeap();
	  }

	  Serial.print(F("Stream..."));
	  String buf;
	  serializeJson(doc, buf);
	  server.send(200, F("application/json"), buf);
	  Serial.print(F("done."));
}

// Define routing
void restServerRouting() {
    server.on("/", HTTP_GET, []() {
    	server.send(200, F("text/html"),
            F("Welcome to the REST Web Server"));
    });
    server.on(F("/helloWorld"), HTTP_GET, getHelloWord);
    server.on(F("/settings"), HTTP_GET, getSettings);
}

// Manage not found URL
void handleNotFound() {
  String message = "File Not Found\n\n";
  message += "URI: ";
  message += server.uri();
  message += "\nMethod: ";
  message += (server.method() == HTTP_GET) ? "GET" : "POST";
  message += "\nArguments: ";
  message += server.args();
  message += "\n";
  for (uint8_t i = 0; i < server.args(); i++) {
    message += " " + server.argName(i) + ": " + server.arg(i) + "\n";
  }
  server.send(404, "text/plain", message);
}

void setup(void) {
  Serial.begin(115200);
  WiFi.mode(WIFI_STA);
  WiFi.begin(ssid, password);
  Serial.println("");

  // Wait for connection
  while (WiFi.status() != WL_CONNECTED) {
    delay(500);
    Serial.print(".");
  }
  Serial.println("");
  Serial.print("Connected to ");
  Serial.println(ssid);
  Serial.print("IP address: ");
  Serial.println(WiFi.localIP());

  // Activate mDNS this is used to be able to connect to the server
  // with local DNS hostmane esp8266.local
  if (MDNS.begin("esp8266")) {
    Serial.println("MDNS responder started");
  }

  // Set server routing
  restServerRouting();
  // Set not found response
  server.onNotFound(handleNotFound);
  // Start server
  server.begin();
  Serial.println("HTTP server started");
}

void loop(void) {
  server.handleClient();
}
Con questa libreria è diventato più leggibile, ma ricorda, anche se Arduino JSON è una libreria fantastica introduce alcuni “problemi” come un utilizzo consistente della memoria per creare il file JSON.
La parte fondamentale della generazione della response JSON è questo codice
	  DynamicJsonDocument doc(512);

	  doc["ip"] = WiFi.localIP().toString();
	  doc["gw"] = WiFi.gatewayIP().toString();
	  doc["nm"] = WiFi.subnetMask().toString();

	  if (server.arg("signalStrength")== "true"){
		  doc["signalStrengh"] = WiFi.RSSI();
	  }

	  if (server.arg("chipInfo")== "true"){
		  doc["chipId"] = ESP.getChipId();
		  doc["flashChipId"] = ESP.getFlashChipId();
		  doc["flashChipSize"] = ESP.getFlashChipSize();
		  doc["flashChipRealSize"] = ESP.getFlashChipRealSize();
	  }
	  if (server.arg("freeHeap")== "true"){
		  doc["freeHeap"] = ESP.getFreeHeap();
	  }

	  Serial.print(F("Stream..."));
	  String buf;
	  serializeJson(doc, buf);
	  server.send(200, F("application/json"), buf);
Come puoi vedere, il comando serializeJson(doc, buf);copia la variabile JSON su String, quindi server.send(200, F("application/json"), buf);restituisce il contenuto del file al client come response.
Ecco il JSON risultante
{
    "ip": "192.168.1.127",
    "gw": "192.168.1.1",
    "nm": "255.255.255.0",
    "signalStrengh": -37,
    "chipId": 10892005,
    "flashChipId": 1458376,
    "flashChipSize": 4194304,
    "flashChipRealSize": 4194304,
    "freeHeap": 41648
}
Grazie
- Server REST su esp8266 o esp32: introduzione
- Server REST su esp8266 o esp32: GET e formattazione JSON
- Server REST su esp8266 o esp32: POST, PUT, PATCH, DELETE
- Server REST su esp8266 o esp32: richieste CORS, OPTION e GET
- Server REST su esp8266 o esp32: richieste CORS, OPTION e POST