
PCF8591 i2c Analog I/O Expander
Library to use i2c pcf8591 IC with Arduino and esp8266.
This IC can control (until 4) analog input and/or one analog output like measuring voltage, reading thermistor value, or fading a led.
Can read the analog value and write analog value with only two wires (perfect for ESP-01).
I try to simplify the use of this IC with a minimal set of operations.
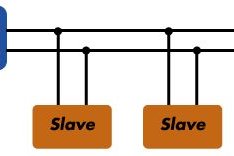
How I2c Works
I2C works with its two wires, the SDA(data line) and SCL(clock line).
Both these lines are open-drain but are pulled up with resistors.
Usually, there is one master and one or multiple slaves on the line, although there can be multiple masters; we’ll talk about that later.
Both masters and slaves can transmit or receive data; therefore, a device can be in one of these four states: master transmit, master receive, slave transmit, slave receive.
Module or IC
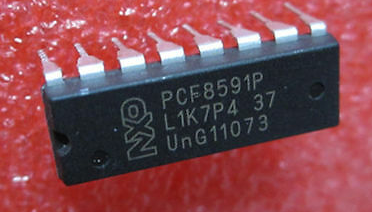
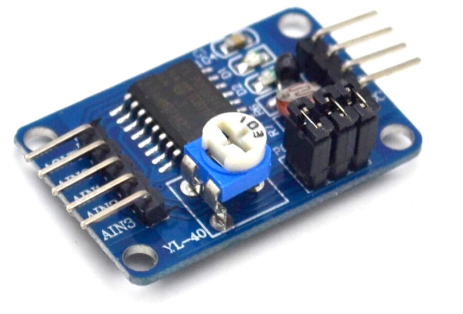
Here the module Module Temperature Illumination - pcf8591 smd - pcf8591
Library
You can find my library here.
To download.
Click the DOWNLOADS button in the top right corner rename the uncompressed folder PCF8591.
Check that the PCF8591 folder contains PCF8591.cpp and PCF8591.h.
Place the PCF8591 library folder your /libraries/ folder.
You may need to create the libraries subfolder if it’s your first library.
Restart the IDE.
Usage
On constructor, you must pass the address of i2c; you can use A0, A1, A2 pins to change the address; you can find the address value here (to check the address, use this guide I2cScanner)
PCF8591(uint8_t address);
for esp8266, if you want to specify SDA e SCL pin, use this:
PCF8591(uint8_t address, uint8_t sda, uint8_t scl);
For esp32, you can pass the TwoWire directly so that you can choose the secondary i2c channel: [updated 29/04/2019]
// Instantiate Wire for generic use at 400kHz
TwoWire I2Cone = TwoWire(0);
// Instantiate Wire for generic use at 100kHz
TwoWire I2Ctwo = TwoWire(1);

PCF8591 pcf8591(&I2Ctwo, PCF8591_I2C_ADDRESS);
// PCF8591 pcf8591(&I2Ctwo, PCF8591_I2C_ADDRESS, 21, 22);
Read Value
As you can see in the image, IC has four analog inputs and one analog output.
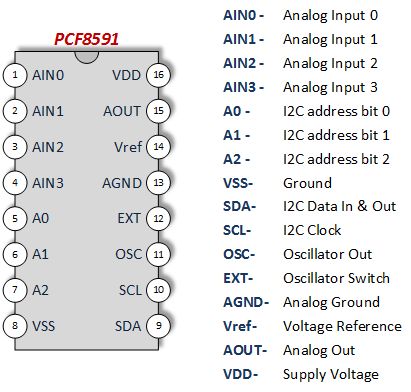
This IC has multiple types of reading, and you can use Analog input or analog channel (when you use single-read analog input and channel are in the pictures). So to read all analog input in one transmission, you can do (the value is from 0 to 255):
	PCF8591::AnalogInput ai = pcf8591.analogReadAll();
	Serial.print(ai.ain0);
	Serial.print(" - ");
	Serial.print(ai.ain1);
	Serial.print(" - ");
	Serial.print(ai.ain2);
	Serial.print(" - ");
	Serial.println(ai.ain3);
if you want to read a single analog input or channel:
int ana = pcf8591.analogRead(AIN0); // read analog 0
Read Value From Channel
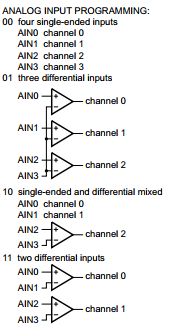
For example, to read the value of channel 0 in Two differential inputs, you must do:
int ana = pcf8591.analogRead(CHANNEL0, TWO_DIFFERENTIAL_INPUT); // read analog 0
Write Value
If you want to write an analog value, you must do (the value is from 0 to 255):
pcf8591.analogWrite(128);
Additional Features
An additional feature is to read or write voltage: For the calculation of voltage, you must pass some parameters:
- microcontrollerReferenceVoltage: get voltage from microcontroller voltage (only AVR no esp8266 for esp 3.3v fixed)
- referenceVoltage: if microcontrollerReferenceVoltage false take this valueThe command are:
	void voltageWrite(float value, bool microcontrollerReferenceVoltage = true, float referenceVoltage = 5.0);
	float voltageRead(uint8_t analogPin, bool microcontrollerReferenceVoltage = true, float referenceVoltage = 5.0);
An example is:
	pcf8591.voltageWrite(2.7); // 2.7Volts output
	delay(3000);
	float ana0V = pcf8591.voltageRead(AIN0); // Read voltage from analog 0
	Serial.println(ana0V);
Examples Connection Diagram

Additional examples
In the time peoples help me to create new examples, I’m going to add them here:
Generate sinusoidal signal
Here from France, Yves Pelletier create an example to generate a sinusoidal signal from the analog output
/*
 *  PCF8591 Analog Port Expand
 *  Production of a sinusoïdal signal using a PCF8591 module
 *
 *  by  Yves Pelletier <http://electroniqueamateur.blogspot.com>
 *
 *  http://electroniqueamateur.blogspot.com/2019/01/pcf8591-et-esp8266-ou-arduino.html
 *
 *
 * PCF8574    ----- Esp32
 * A0         ----- GRD
 * A1         ----- GRD
 * A2         ----- GRD
 * SDA        ----- A4
 * SCL        ----- A5
 *
 *
 */

#include "PCF8591.h" // bibliothèque https://github.com/xreef/PCF8591_library
#define PCF8591_I2C_ADDRESS 0x48  //adresse i2c du module PCF8591

PCF8591 pcf8591(PCF8591_I2C_ADDRESS);

int compteur;

void setup()
{
  pcf8591.begin();
}

void loop(){
  pcf8591.analogWrite(100 + 100 * sin(2*3.1416*compteur/200) ); // sinus

  // pcf8591.analogWrite(compteur ); // dent de scie

  compteur++;
  if (compteur > 200){
    compteur = 0;
  }
  delay(1);
}
Esp32 connection using second i2c channel
/*
 * 	PCF8591 Analog Port Expand
 *  Read all analog pins and write value on analog ouput
 *
 *  by Mischianti Renzo <https://mischianti.org>
 *
 *  https://mischianti.org/pcf8591-i2c-analog-i-o-expander/
 *
 *
 * PCF8574    ----- Esp32
 * A0         ----- GRD
 * A1         ----- GRD
 * A2         ----- GRD
 * SDA        ----- 21
 * SCL        ----- 22
 *
 *
 */
#include "Arduino.h"

#include "PCF8591.h"
#define PCF8591_I2C_ADDRESS 0x48

// Instantiate Wire for generic use at 400kHz
TwoWire I2Cone = TwoWire(0);
// Instantiate Wire for generic use at 100kHz
TwoWire I2Ctwo = TwoWire(1);

// Set i2c address
//PCF8591 pcf8591(&I2Ctwo, PCF8591_I2C_ADDRESS);
 PCF8591 pcf8591(&I2Ctwo, 0x20, 21, 22);

void setup()
{
	Serial.begin(115200);
	I2Cone.begin(16,17,400000); // SDA pin 16, SCL pin 17, 400kHz frequency

	pcf8591.begin();
}

void loop()
{
	PCF8591::AnalogInput ai = pcf8591.analogReadAll();
	Serial.print(ai.ain0);
	Serial.print(" - ");
	Serial.print(ai.ain1);
	Serial.print(" - ");
	Serial.print(ai.ain2);
	Serial.print(" - ");
	Serial.println(ai.ain3);

	delay(3000);

	int ana = pcf8591.analogRead(AIN0);
	Serial.print("AIN0 --> ");
	Serial.println(ana);

	ana = pcf8591.analogRead(AIN1);
	Serial.print("AIN1 --> ");
	Serial.println(ana);

	ana = pcf8591.analogRead(AIN2);
	Serial.print("AIN2 --> ");
	Serial.println(ana);

	ana = pcf8591.analogRead(AIN3);
	Serial.print("AIN3 --> ");
	Serial.println(ana);
	delay(3000);

	pcf8591.analogWrite(0);
	delay(3000);
	pcf8591.analogWrite(128);
	delay(3000);
	pcf8591.analogWrite(255);
	delay(3000);
}


Hi, your library works for ESP32 with version 1.0.x, but it doesn’t work for ESP32 with version 2.0.x in the Arduino board manager. Do you know why?
Hi Darek,
what is the problem?
Can you post the error log? (better if you open a topic in the relative section).
Bye Renzo