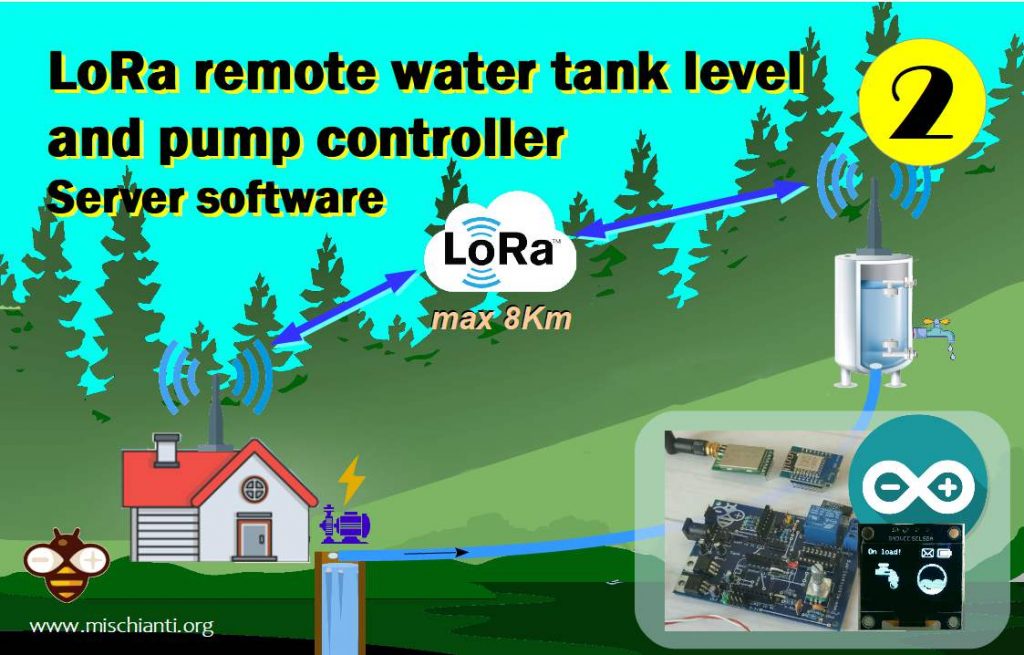
LoRa remote water level and pump controller (esp8266): server software – 2
Now we are going to examine the functional logic of the devices.
The Server has the command of the situation, and It must control the pump with a relay and expect the status from the client. For the safety system, we insert an hour limit of the active pump if some problems occur, or you can use a ping mode that expects a keep-alive message every 10 seconds if there is no message in that period.
EByte E32 configuration
The LoRa device is an E32, and It’s configured for a fixed transmission with a high wake-up time to send a big preamble to ensure the client It’s waked.
Refer to the article “Ebyte LoRa E32 device for Arduino, esp32 or esp8266: configuration“.
		ResponseStructContainer c;
		c = e32ttl.getConfiguration();
		Configuration configuration = *(Configuration*) c.data;
		configuration.ADDL = SERVER_ADDL;
		configuration.ADDH = SERVER_ADDH;
		configuration.CHAN = SERVER_CHANNEL;
		configuration.OPTION.fixedTransmission = FT_FIXED_TRANSMISSION;
		configuration.OPTION.wirelessWakeupTime = WAKE_UP_2000;

		configuration.OPTION.fec = FEC_1_ON;
		configuration.OPTION.ioDriveMode = IO_D_MODE_PUSH_PULLS_PULL_UPS;
		configuration.OPTION.transmissionPower = POWER_20;

		configuration.SPED.airDataRate = AIR_DATA_RATE_010_24;
		configuration.SPED.uartBaudRate = UART_BPS_9600;
		configuration.SPED.uartParity = MODE_00_8N1;

		ResponseStatus rs = e32ttl.setConfiguration(configuration, WRITE_CFG_PWR_DWN_SAVE);
		SERIAL_DEBUG.println(rs.getResponseDescription());
Buttons and relay
Menu and actions are managed by a pcf8574 and an encoder, and I explain better the wiring and the software in my tutorial “PCF8574 i2c digital I/O expander: Arduino, esp8266 and esp32, rotary encoder“.
But you must pay attention to managing interruptions on the shared i2c channel. In this case, I must disable and re-enable the pcf8574 interrupt when refreshing the i2c display, and you must check the relative article on ssd1306.
		pcf8574.detachInterrupt();
		if (changedButton) {
			currentScreen = clickMenu(currentScreen, encoderValue);
			changedButton = false;
		}

		renderScreen(currentScreen);

		display.clearDisplay();

		pcf8574.attachInterrupt();
The relay is managed by a single pin and live synchronized.
void startPump(){
	DEBUG_PRINTER.println("START PUMP");
	pumpIsActive = true;
	digitalWrite(RELAY_PIN, HIGH);

	pumpStartTime = millis();
	lastMillisMessageReceived = millis();
}

void stopPump(){
	DEBUG_PRINTER.println("STOP PUMP");
	pumpIsActive = false;
	digitalWrite(RELAY_PIN, LOW);

	pumpStopTime = millis();
}
Display menu
I use an Oled ssd1306 display, very little, the complete animations guide and icon generation here “SSD1306 OLED Display: draw images, splash, and animations“.
I’m going to manage a set of Icons to understand the operation better. I change the menu icon by rotating an encoder and selecting it by clicking the encoder.
I manage the multilingual including a file with all the labels
#include "include/ita.h"
//#include "include/eng.h"
I use a simple state machine to manage the Display; a switch managed by the encoder value is used to show the correct icon; the values are:
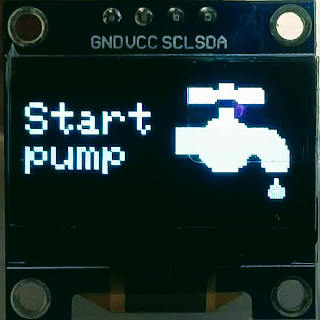
PUMP_START_MENU: start the pump and wait for it to be full; the only additional security is a timer that stops the pump after one hour.
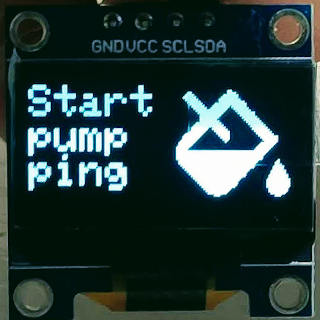
PUMP_START_PING_MENU: start the pump and wait for a ping message every 20 seconds; if the tank is full or there is no message after 20 seconds, It stops the pump.
PUMP_STOP_MENU: stop the pump and tell the client to go into sleep mode.
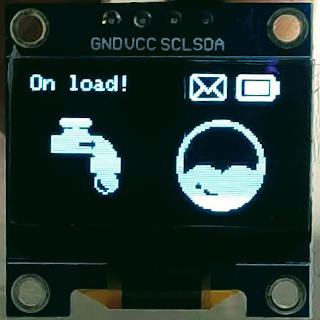
STATUS_MENU: graphical status of the devices (pump active, battery status, and tank level).
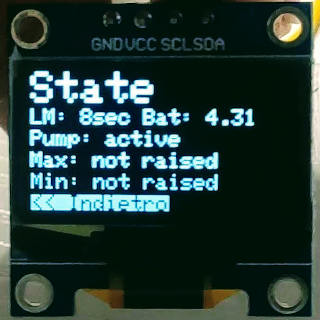
STATUS_MENU_DETAILED: descriptive status of the devices.
void mainMenu(String title = SCREEN_MAIN_TITLE) {
display.clearDisplay(); //for Clearing the display
switch (encoderValue) {
case PUMP_START_MENU:
displayIconLabel(START_PUMP_LABEL, 2);
display.drawBitmap(70, 5, tapDrop, 54, 54, WHITE); // display.drawBitmap(x position, y position, bitmap data, bitmap width, bitmap height, color)
break;
case PUMP_START_PING_MENU:
displayIconLabel(START_PUMP_PING_LABEL, 3);
display.drawBitmap(70, 5, containerDrop, 54, 54, WHITE); // display.drawBitmap(x position, y position, bitmap data, bitmap width, bitmap height, color)
break;
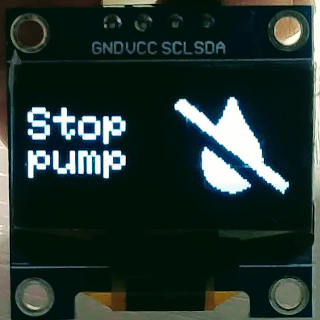
case PUMP_STOP_MENU:
displayIconLabel(STOP_PUMP_MENU_LABEL, 2);
display.drawBitmap(70, 5, dropSlash, 54, 54, WHITE); // display.drawBitmap(x position, y position, bitmap data, bitmap width, bitmap height, color)
break;
case STATUS_MENU:
displayIconLabel(STATUS_DEVICE_MENU_LABEL, 1);
display.drawBitmap(70, 5, info, 54, 54, WHITE); // display.drawBitmap(x position, y position, bitmap data, bitmap width, bitmap height, color)
break;
case STATUS_MENU_DETAILED:
displayIconLabel(STATUS_DETT_MENU_LABEL, 1);
display.drawBitmap(70, 5, info, 54, 54, WHITE); // display.drawBitmap(x position, y position, bitmap data, bitmap width, bitmap height, color)
break;
default:
break;
}
display.display();
}
The click action is managed by a function that uses the current screen and the encoder value to the correct screen.
SCREEN clickMenu(SCREEN screen, int state){
	SCREEN returningScreen = SCREEN_ERROR;
	switch (screen) {
		case SCREEN_MAIN:
			returningScreen = mainMenuState((MENU_MAIN_STATE)state);
			break;
		case SCREEN_STATUS_DEVICE:
		case SCREEN_STATUS_DEVICE_DETAILED:
		case SCREEN_ERROR:
			returningScreen = checkMenuState();
			break;
		default:
			break;
	}

	encoderValue = 0;
	screenEncoderSizeMax = screenEncoderSize[returningScreen];

	SERIAL_DEBUG.print(F("CLICK --> "));

	SERIAL_DEBUG.print( F("FROM SCREEN --> ") );

	SERIAL_DEBUG.print( screen );
	SERIAL_DEBUG.print(F(" - TO SCREEN --> "));
	SERIAL_DEBUG.print( returningScreen );
	SERIAL_DEBUG.print(F(" - MENU STATE --> "));
	SERIAL_DEBUG.println( state );

	return returningScreen;
}
Then, a function renders the correct screen based on the screen selected:
void renderScreen(SCREEN screen){
	switch (screen) {
		case SCREEN_MAIN:
			mainMenu();
			break;
		case SCREEN_STATUS_DEVICE:
			checkPage();
			break;
		case SCREEN_STATUS_DEVICE_DETAILED:
			checkPageDetailed();
			break;
		case SCREEN_ERROR:
			errorPage();
			break;

		default:
			break;
	}
}
Actions
When a state is selected (clicked), the correct operation is processed by the relative state management, and the return SCREEN shows the executed action.
SCREEN clickMenu(SCREEN screen, int state){
	SCREEN returningScreen = SCREEN_ERROR;
	switch (screen) {
		case SCREEN_MAIN:
			returningScreen = mainMenuState((MENU_MAIN_STATE)state);
			break;
		case SCREEN_STATUS_DEVICE:
		case SCREEN_STATUS_DEVICE_DETAILED:
		case SCREEN_ERROR:
			returningScreen = checkMenuState();
			break;
		default:
			break;
	}

	encoderValue = 0;
	screenEncoderSizeMax = screenEncoderSize[returningScreen];

	SERIAL_DEBUG.print(F("CLICK --> "));

	SERIAL_DEBUG.print( F("FROM SCREEN --> ") );

	SERIAL_DEBUG.print( screen );
	SERIAL_DEBUG.print(F(" - TO SCREEN --> "));
	SERIAL_DEBUG.print( returningScreen );
	SERIAL_DEBUG.print(F(" - MENU STATE --> "));
	SERIAL_DEBUG.println( state );

	return returningScreen;
}
Here are the click actions for the main screen
SCREEN mainMenuState(MENU_MAIN_STATE state){
	SERIAL_DEBUG.print(F("mainMenuState --> "));
	SERIAL_DEBUG.println(state);
	ResponseStatus rs;
	switch (state) {
		case PUMP_START_MENU:
			DEBUG_PRINTLN("PUMP_START_MENU");
			stopPump();

			operationalSelected = OPERATION_NORMAL;
			SERIAL_DEBUG.println("OPERATION_NORMAL");

			rs = sendPumpMessageToClient("start", true);

			if (rs.code!=SUCCESS) {
				errorMessage = rs.getResponseDescription();
				return SCREEN_ERROR;
			}

			actionSelected = ACTION_AUTO;
			return SCREEN_STATUS_DEVICE;
			break;
		case PUMP_START_PING_MENU:
			DEBUG_PRINTLN("PUMP_START_PING_MENU");

			stopPump();

			operationalSelected = OPERATION_PING;
			SERIAL_DEBUG.println("OPERATION_PING");

			rs = sendPumpMessageToClient("start", true);

			if (rs.code!=SUCCESS) {
				errorMessage = rs.getResponseDescription();
				return SCREEN_ERROR;
			}
			actionSelected = ACTION_AUTO;
			return SCREEN_STATUS_DEVICE;
			break;
		case PUMP_STOP_MENU:
			DEBUG_PRINTLN("PUMP_STOP_MENU");

			stopPump();
			actionSelected = ACTION_STOP;
			operationalSelected = OPERATION_DISABLED;

			rs = sendPumpMessageToClient("stopp", true);
			if (rs.code!=SUCCESS) {
				errorMessage = rs.getResponseDescription();
				return SCREEN_ERROR;
			}else{
				return SCREEN_STATUS_DEVICE;
			}

			break;
		case STATUS_MENU:
			return SCREEN_STATUS_DEVICE;
			break;
		case STATUS_MENU_DETAILED:
			return SCREEN_STATUS_DEVICE_DETAILED;
			break;
		default:
			break;
	}
	return SCREEN_ERROR;
};
The function manages the messages sendPumpMessageToClient
ResponseStatus sendPumpMessageToClient(String action, bool wakeUp){
	ResponseStatus rsW;
	if (wakeUp){
		rsW = setWakeUpMode();
	}else{
		rsW = setNormalMode();
	}
	SERIAL_DEBUG.println(rsW.getResponseDescription());
	if (rsW.code != SUCCESS) return rsW;

	JsonObject root = doc.to<JsonObject>();

	root["type"] = action;
	root["mode"] = (int)operationalSelected;

	int size = measureJson(doc)+1;

	char buf[size];
	serializeJson(doc, buf, size);
	SERIAL_DEBUG.println(buf);
	SERIAL_DEBUG.println(measureJson(doc));

	SERIAL_DEBUG.print("Send message to client ");
	SERIAL_DEBUG.print(CLIENT_ADDH, DEC);
	SERIAL_DEBUG.print(" ");
	SERIAL_DEBUG.print(CLIENT_ADDL, DEC);
	SERIAL_DEBUG.print(" ");
	SERIAL_DEBUG.print(CLIENT_CHANNEL, HEX);
	SERIAL_DEBUG.println(" ");

	SERIAL_DEBUG.println("Mode --> ");
	SERIAL_DEBUG.println(e32ttl.getMode());

	rsW = e32ttl.sendFixedMessage(CLIENT_ADDH, CLIENT_ADDL, CLIENT_CHANNEL, buf, size);
	SERIAL_DEBUG.println(rsW.getResponseDescription());
	if (rsW.code != SUCCESS) return rsW;

	rsW = setReceiveMode();

	return rsW;
}
Thanks
You can find the complete master code on my GitHub as usual.

- LoRa remote water tank level and pump controller: intro
- LoRa remote water level and pump controller: server software
- LoRa remote water level and pump controller: client software
- LoRa remote water level and pump controller: server PCB
- LoRa remote water level and pump controller: client PCB
- LoRa remote water level and pump controller: assemble server and 3D printed case
- LoRa remote water level and pump controller: assemble client and 3D printed case