
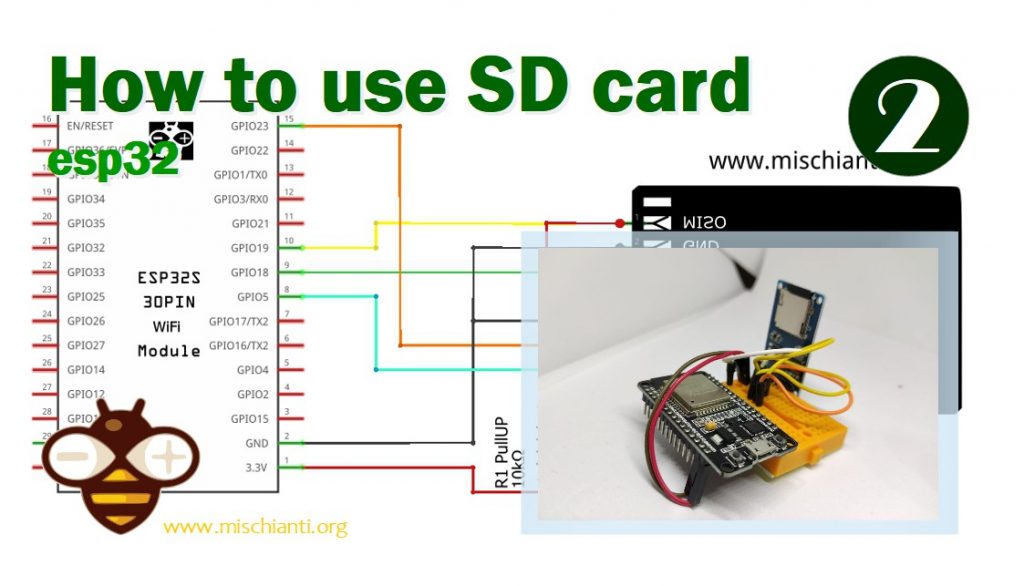
How to use SD card with esp32 – 2
When you use a microcontroller, an important feature is storing data, logging or setting, for a web server, or showing images.
The better solution is an SD card because It’s a simple, small, and low-power device.
Protocol
SD card has a native host interface apart from the SPI mode for communicating with primary devices. The native interface uses four lines for data transfer where the microcontroller has an SD card controller module, and it needs a separate license. Since the SPI is a widely used protocol and is available in most low-cost microcontrollers, the SPI mode is the widely used interface in low-cost embedded systems. The operating voltage range of the SD family is 2.7V to 3.6V, and this is indicated in the operation condition register (OCR). Exist a low-power SD Card that operates at 1.8V but isn’t so used.
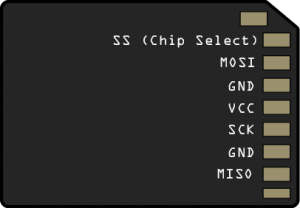
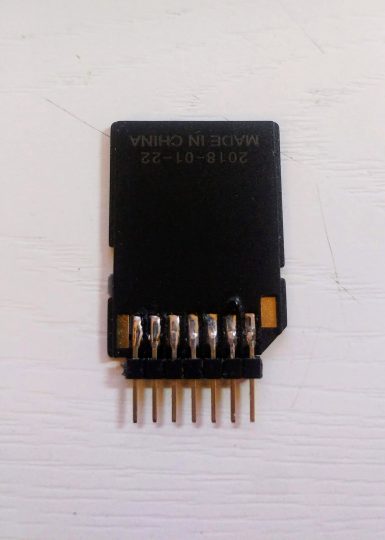
Pinout
Exists various form factors, but the base pinout is the same.
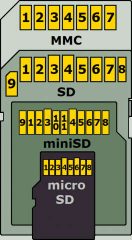
| Pin Number | Pin Name | In SD Mode | In SPI Mode |
| 1 | DAT2/X | Connector Data line 2 | No use |
| 2 | DAT3/CS | Connector Data line 3 | Chip Select |
| 3 | CMD/DI | Command / Response Line | Data Input |
| 4 | VDD/VDD | Power supply (+3.3V) | Power supply (+3.3V) |
| 5 | CLK/SCLK | Clock | Serial Clock |
| 6 | VSS/VSS | Ground | Ground |
| 7 | DAT0/D0 | Connector Data line 0 | Data Out |
| 8 | DAT1/X | Connector Data line 1 | No use |
Now we are going to interface SD card for first.
Wiring
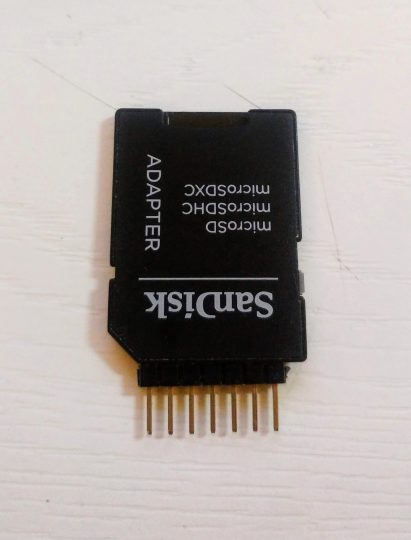
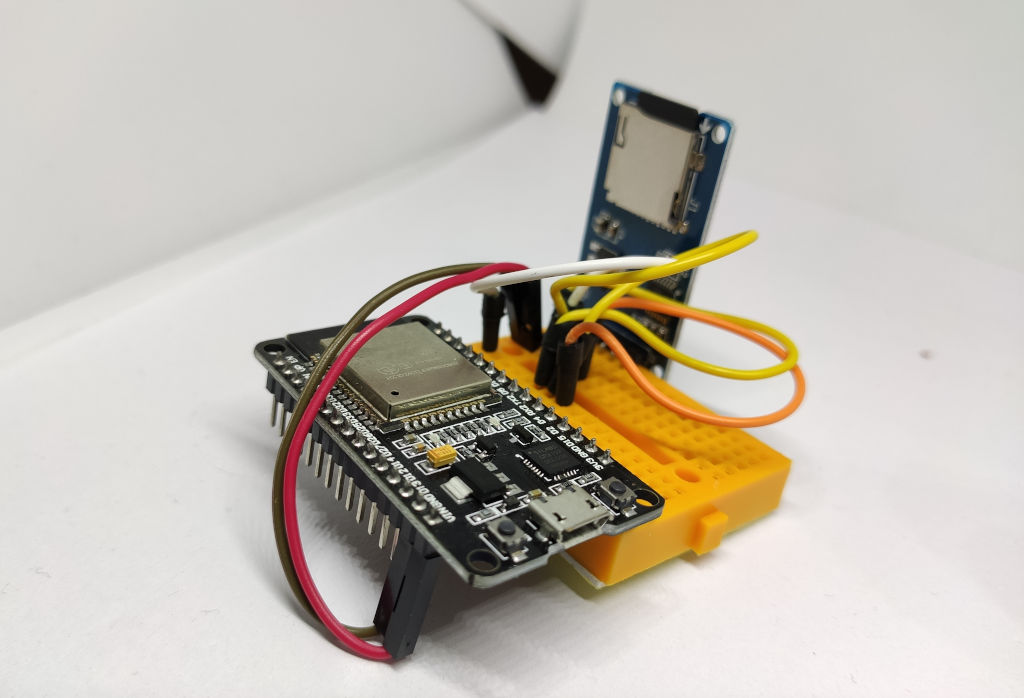
The operating voltage of our esp32 simplifies the schema respect of an Arduino UNO at 5v. To interface the SD card, I use an SD adapter with micro SD, and the result is this.
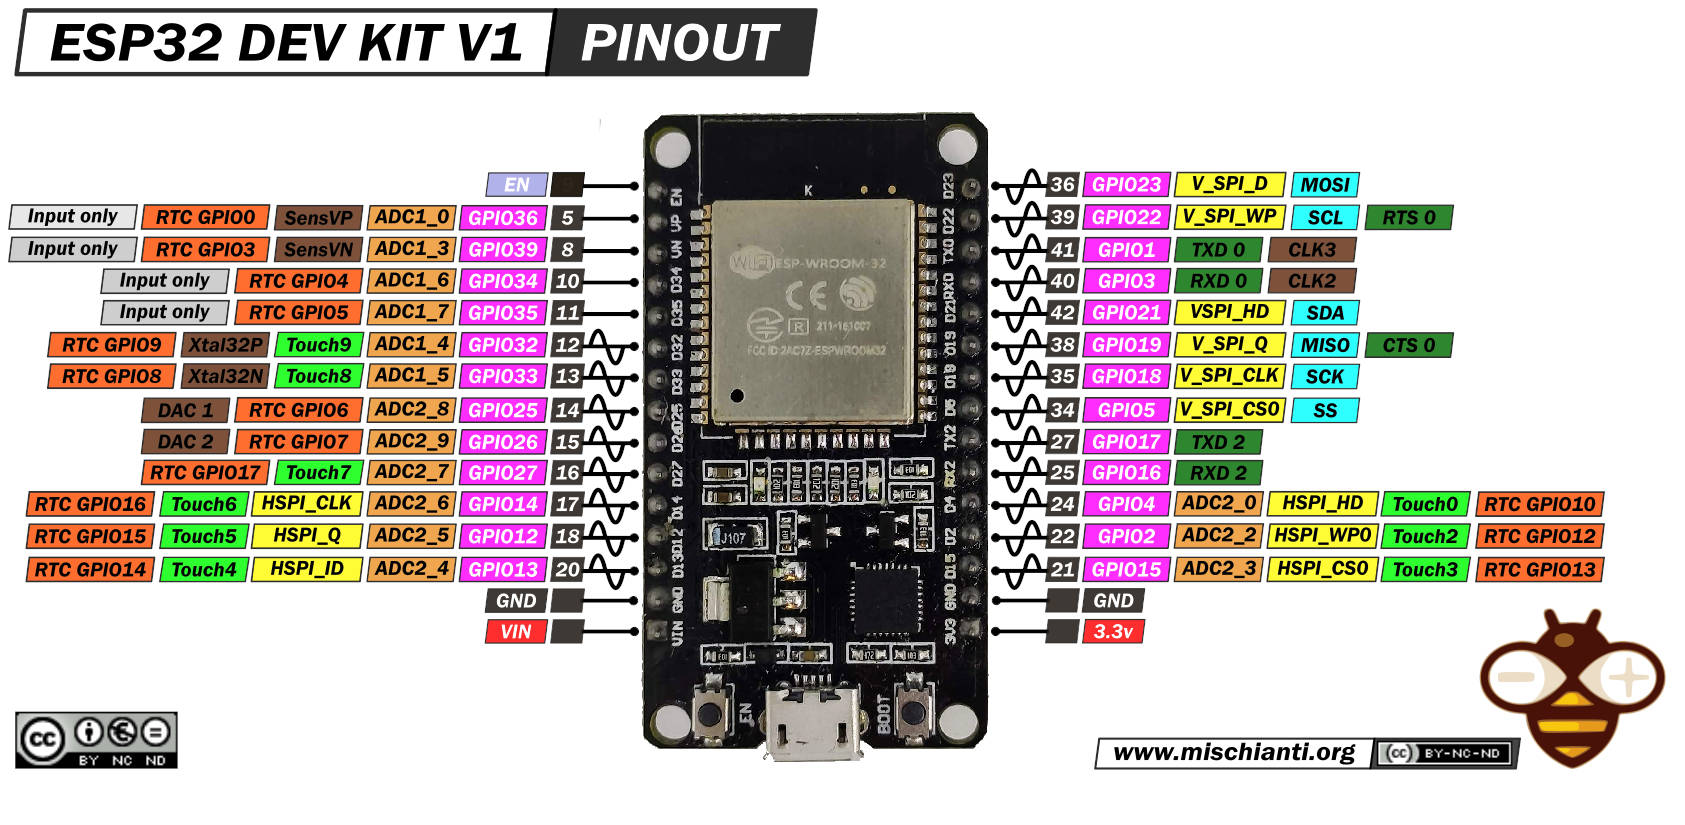
esp32
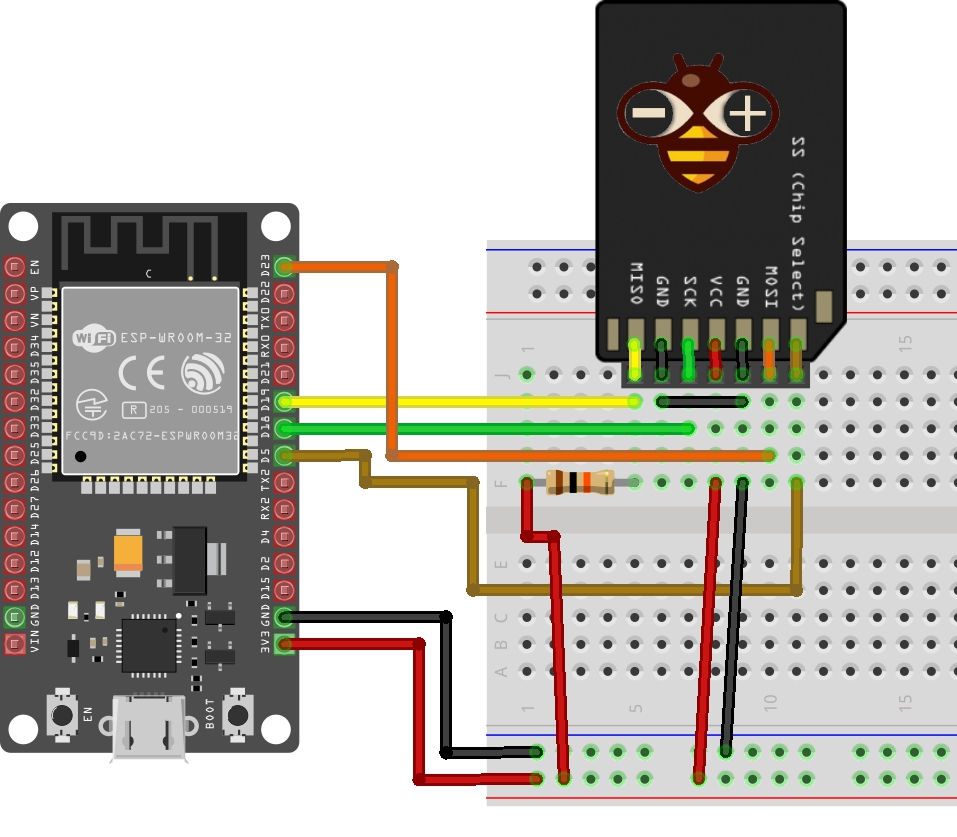
Here is the connection schema on the breadboard.
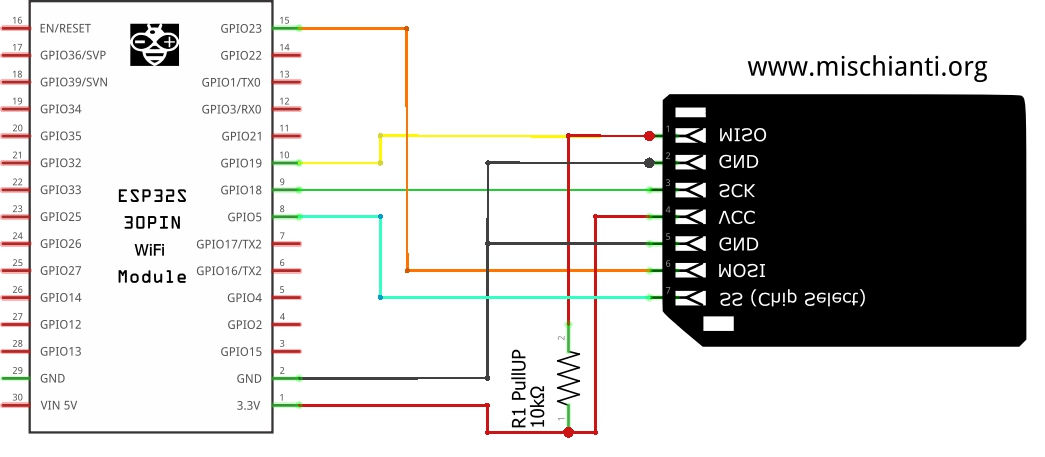
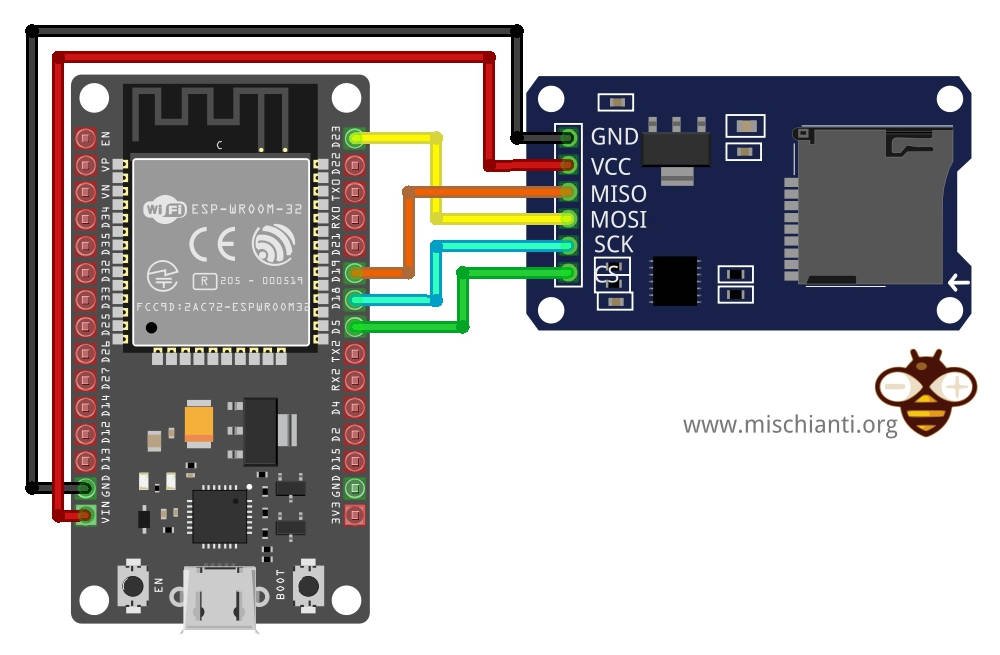
And here is the electronic schema.
REMEMBER!! You can use only an 8.3 file. For example, a file like config.txt is accepted, but configuration.text not, because the max file length is eight characters and extension 3.
Modules
Exists various modules to interface your microcontroller with your device, and It works precisely the Arduino connection schema for the 5v adapter and like esp8266 connection schema for 3.3v. When you buy one, you must pay attention to the operating voltage.
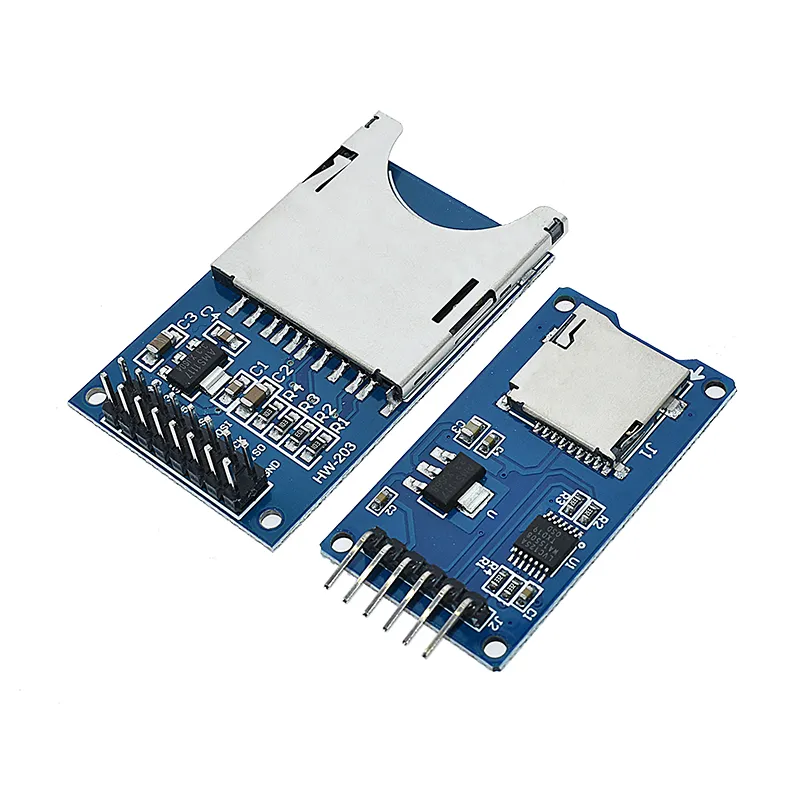
Exists some variant that supports 3.3v and 5v, like the one linked here.
You can find sd card module on AliExpress
Here is the wiring diagram with the adapter.
Commands
SD Class
SD.begin() SD.begin(uint8_t ssPin=SS, SPIClass &spi=SPI, uint32_t frequency=4000000, const char * mountpoint=”/sd”, uint8_t max_files=5)
Initializes the SD library and card. This begins using the SPI bus and the chip select pin, which defaults to the hardware SS pin. Returns true on success; false on failure.
SD.cardType()
Return the card type inserted
- CARD_NONE
- CARD_MMC
- CARD_SD
- CARD_SDHC
- CARD_UNKNOWN
SD.exists(filename)
Tests whether a file or directory exists on the SD card. Returns true if the file or directory exists, false if not.
SD.mkdir(filename)
Create a directory on the SD card. This will also create any intermediate directories that don’t already exist; e.g. SD.mkdir(“a/b/c”) will create a, b, and c. Returns true if the creation of the directory succeeded, false if not.
SD.open(filepath) sd.open(filepath, mode)
Opens a file on the SD card. If the file is opened for writing, it will be created if it doesn’t already exist (but the directory must already exist). Parameter mode (optional): the mode to open the file, defaults to FILE_READ – byte. one of FILE_READ: open the file for reading, starting at the beginning of the file. FILE_WRITE: open the file for reading and writing, beginning at the end of the file. Returns a File object referring to the opened file; if the file couldn’t be opened, this object will evaluate to false in a boolean context, i.e. you can test the return value with “if (f)”.
SD.remove(filename)
Remove a file from the SD card. Returns true if the removal of the file succeeded, false if not. (if the file didn’t exist, the return value is unspecified)
SD.rename(filenameFrom, filenameTo)
Rename or move a file in the SD card. Returns true if the renaming work else false
SD.rmdir(filename)
Remove a directory from the SD card. The directory must be empty. Returns true if the removal of the directory succeeded, false if not. (if the directory didn’t exist, the return value is unspecified)
SD.totalBytes()
Return the total bytes enabled on SD. Returns bytes.
SD.usedBytes()
Return the total used bytes enabled on SD. Returns bytes.
SD.cardSize()
Return the size of the SD. Returns bytes
File class
file.name()
Returns the file name
file.available()
Check if there are any bytes available for reading from the file. Returns the number of bytes.
file.close()
Close the file, and ensure that any data written to it is physically saved to the SD card.
file.flush()
Ensures that any bytes written to the file are physically saved to the SD card. This is done automatically when the file is closed.
file.peek()
Read a byte from the file without advancing to the next one. That is, successive calls to peek() will return the same value as the next call to read().
file.position()
Get the current position within the file (i.e. the location to which the next byte will be read from or written to). Returns the position within the file (unsigned long).
file.print(data) file.print(data, base)
Print data to the file, which must have been opened for writing. Prints numbers as a sequence of digits, each an ASCII character (e.g. the number 123 is sent as the three characters ‘1’, ‘2’, ‘3’). Parameter data: the data to print (char, byte, int, long, or string), BASE (optional): the base in which to print numbers: BIN for binary (base 2), DEC for decimal (base 10), OCT for octal (base 8), HEX for hexadecimal (base 16). Returns the number of bytes written, though reading that number is optional.
file.println() file.println(data) file.println(data, base)
As print but with final return
file.seek(pos)
Seek to a new position in the file, which must be between 0 and the size of the file (inclusive). Parameters: pos: the position to which to seek (unsigned long). Returns true for success, false for failure (boolean)
file.size()
Get the size of the file. Returns the size of the file in bytes (unsigned long).
file.read() file.read(buf, len)
Read from the file. Returns the next byte (or character), or -1 if none is available.
file.write(data) file.write(buf, len)
Write data to the file. Returns the number of bytes written, though reading that number is optional
file.isDirectory()
Directories (or folders) are special kinds of files, this function reports if the current file is a directory or not. Returns true if it is a directory.
file.openNextFile()
Reports the next file or folder in a directory. Returns the following file or folder in the path.
file.rewindDirectory()
It will bring you back to the first file in the directory, used in conjunction with openNextFile().
file.getLastWrite()
Returns the data of the last write/change in epoch time.
Examples
In the Arduino IDE, some examples are very useful and well commented on.
Here is a sketch that extracts all information about the SD card used.
/*
  SD card test for esp32

  This example shows how use the utility libraries

  The circuit:
    SD card attached to SPI bus as follows:
		SS    = 5;
		MOSI  = 23;
		MISO  = 19;
		SCK   = 18;


   by Mischianti Renzo <https://mischianti.org>

   https://www.mischianti.org
*/
// include the SD library:
#include <SPI.h>
#include <SD.h>

// WeMos D1 esp8266: D8 as standard
const int chipSelect = SS;

void printDirectory(File dir, int numTabs);

void setup() {
  // Open serial communications and wait for port to open:
  Serial.begin(9600);
  while (!Serial) {
    ; // wait for serial port to connect. Needed for native USB port only
  }


  Serial.print("\nInitializing SD card...");

  // we'll use the initialization code from the utility libraries
  // since we're just testing if the card is working!
  if (!SD.begin(chipSelect)) {
    Serial.println("initialization failed. Things to check:");
    Serial.println("* is a card inserted?");
    Serial.println("* is your wiring correct?");
    Serial.println("* did you change the chipSelect pin to match your shield or module?");
    while (1);
  } else {
    Serial.println("Wiring is correct and a card is present.");
  }

  // print the type of card
  Serial.println();
  Serial.print("Card type:         ");
  switch (SD.cardType()) {
    case CARD_NONE:
      Serial.println("NONE");
      break;
    case CARD_MMC:
      Serial.println("MMC");
      break;
    case CARD_SD:
      Serial.println("SD");
      break;
    case CARD_SDHC:
      Serial.println("SDHC");
      break;
    default:
      Serial.println("Unknown");
  }

  // print the type and size of the first FAT-type volume
//  uint32_t volumesize;
//  Serial.print("Volume type is:    FAT");
//  Serial.println(SDFS.usefatType(), DEC);

  Serial.print("Card size:  ");
  Serial.println((float)SD.cardSize()/1000);

  Serial.print("Total bytes: ");
  Serial.println(SD.totalBytes());

  Serial.print("Used bytes: ");
  Serial.println(SD.usedBytes());

  File dir =  SD.open("/");
  printDirectory(dir, 0);

}

void loop(void) {
}

void printDirectory(File dir, int numTabs) {
  while (true) {

    File entry =  dir.openNextFile();
    if (! entry) {
      // no more files
      break;
    }
    for (uint8_t i = 0; i < numTabs; i++) {
      Serial.print('\t');
    }
    Serial.print(entry.name());
    if (entry.isDirectory()) {
      Serial.println("/");
      printDirectory(entry, numTabs + 1);
    } else {
      // files have sizes, directories do not
      Serial.print("\t\t");
      Serial.print(entry.size(), DEC);
      time_t lw = entry.getLastWrite();
      struct tm * tmstruct = localtime(&lw);
      Serial.printf("\tLAST WRITE: %d-%02d-%02d %02d:%02d:%02d\n", (tmstruct->tm_year) + 1900, (tmstruct->tm_mon) + 1, tmstruct->tm_mday, tmstruct->tm_hour, tmstruct->tm_min, tmstruct->tm_sec);
    }
    entry.close();
  }
}
Here is an example of a reading written on an SD card.
/*
  SD card read/write

  This example shows how to read and write data to and from an SD card file
  The circuit:
   SD card attached to SPI bus as follows:
		SS    = 5;
		MOSI  = 23;
		MISO  = 19;
		SCK   = 18;

  created   Nov 2010
  by David A. Mellis
  modified 9 Apr 2012
  by Tom Igoe

  This example code is in the public domain.

*/

#include <SPI.h>
#include <SD.h>

File myFile;

void setup() {
  // Open serial communications and wait for port to open:
  Serial.begin(9600);
  while (!Serial) {
    ; // wait for serial port to connect. Needed for native USB port only
  }


  Serial.print("Initializing SD card...");

  if (!SD.begin(SS)) {
    Serial.println("initialization failed!");
    while (1);
  }
  Serial.println("initialization done.");

  // open the file. note that only one file can be open at a time,
  // so you have to close this one before opening another.
  myFile = SD.open("test.txt", FILE_WRITE);

  // if the file opened okay, write to it:
  if (myFile) {
    Serial.print("Writing to test.txt...");
    myFile.println("testing 1, 2, 3.");
    // close the file:
    myFile.close();
    Serial.println("done.");
  } else {
    // if the file didn't open, print an error:
    Serial.println("error opening test.txt");
  }

  // re-open the file for reading:
  myFile = SD.open("test.txt");
  if (myFile) {
    Serial.println("test.txt:");

    // read from the file until there's nothing else in it:
    while (myFile.available()) {
      Serial.write(myFile.read());
    }
    // close the file:
    myFile.close();
  } else {
    // if the file didn't open, print an error:
    Serial.println("error opening test.txt");
  }
}

void loop() {
  // nothing happens after setup
}
Thanks
In the following articles, we will see how to use other operating systems with our SD card to overcome the limitations of the standard SD library.
- How to use SD card with esp8266 and Arduino
- How to use SD card with esp32
- How to use SD card with stm32 and SdFat library


Here is my mission:
I would like to write files to SD card and transfer them via FTP to PC when needed.
Does ESP32 enable FTP from an SD card?
Any hints are highly appreciated.
Hi Dusan,
you can install an FTP server to the ESP32 and configure It to use SD card, you can refer this article for more information
FTP server on esp8266 and esp32
If you want use esp32 as client you can use this library.
Bye Renzo
Nothing appears on the Monitor. Already checked with different cards and modules.
Any tip?
Thanks!
Hi Tamer,
with so few information it’s difficult to help you, i think you must open a topic on forum with schema and code.
But if you use a module remember that sometime you must power it with 5v.
Bye Renzo
Is there a way to have SD card and other SPI devices? Because Im trying to use the SD card and a MAX31855 and when initializing the SD card the other device doesnt work anymore.
Hi Alejandro,
cam you give us more information?
Open a topic on forum and put your code and the wiring schema.
Bye Renzo
Hi,
Mistake on the first example : you define chipSelect but you dont use it.
Replace SS with chipSelect at line 39.
Thanks
Azzz… Thanks, I fixed It.
esp32 recognizes the sd card, but does not write or read the files, any suggestions?
Hi Rafael,
do you already try to reformat the SD?
Bye Renzo
Hi, I already did that, but dont work,
Initializing SD card…initialization done.
error opening test.txt
error opening test.txt
Hi Rafael,
pay attention to the power of SD card adapter, check if It support 5v power supply.
If you continue to have a problem open a forum topic and post your code, SD card adapter model and the wiring.
Bye Renzo
I solved this by putting a “\” before the file name, but when I try to record new information the esp32 erases everything and records the new information, any suggestions?
Hi Rafael,
check if you initialize the communication with true as parameter.
SD.begin(true)Bye Renzo
Hello,
I met exactly the sames problems as Rafael
Did you solve the problem
Thank you for you help
Hi Jacques,
I think there is a problem with the code you use.
Open a topic forum and post your code.
Bye Renzo
Hi Renzo,
Following your answer, I look for on the forum and I find a solution : now the code works properly by using file_append instead of file_write. Thank you again.
Jacques
Ahh! good.
Thanks for your feedback.
Bye Renzo