How to manage dynamic WIFI configuration on esp8266 or esp32
One most common need when you use IOT device with WIFI is the first connection attemp, It’s very tedious to hard code WIFI parameter, but a library allows you to connect your esp8266/esp32 to different Access Points (AP) without hard code they. Additionally, you can also add custom parameters (variables) and manage multiple SSID connections with the WiFiManager library.
Here the lifecycle of the library:
- WiFiManager start your esp8266 in Station mode, and try to find previously saved SSID and password;
- If this process fails, it sets the ESP into Access Point mode;
- Than you must connect to the AP exposed;
- After establishing a connection with the AP created, you can go to the default IP address 192.168.4.1 to open a web page that allows you to configure your SSID and password;
- Than you must enter/select SSID and password, than esp reboots and tries to connect;
- If it establishes a connection, the process is completed successfully. Otherwise, it will be set up as an Access Point.
Library
You can find library here, but you can directly download from ArduinoIDE Tools --> Manage library...

How to
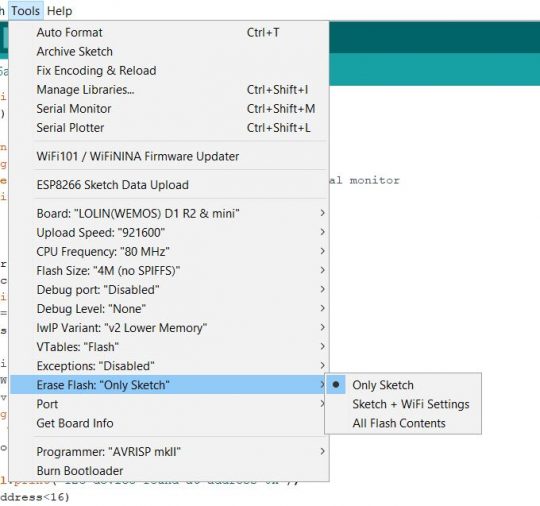
First set your IDE to override all WiFi setting:
Standard use
Than add this sketch modified from original example
/*
 * Simple WiFiManager usage
 * https://mischianti.org/
 *
 * The MIT License (MIT)
 * written by Renzo Mischianti <www.mischianti.org>
 */

#include <ESP8266WiFi.h>

//needed for library
#include <DNSServer.h>
#include <ESP8266WebServer.h>
#include "WiFiManager.h"          //https://github.com/tzapu/WiFiManager

void configModeCallback (WiFiManager *myWiFiManager) {
  Serial.println("Entered config mode");
  Serial.println(WiFi.softAPIP());
  //if you used auto generated SSID, print it
  Serial.println(myWiFiManager->getConfigPortalSSID());
}

void setup() {
  // put your setup code here, to run once:
  Serial.begin(115200);

  //WiFiManager
  //Local intialization. Once its business is done, there is no need to keep it around
  WiFiManager wifiManager;
  //reset settings - for testing
  //wifiManager.resetSettings();

  //set callback that gets called when connecting to previous WiFi fails, and enters Access Point mode
  wifiManager.setAPCallback(configModeCallback);

  //fetches ssid and pass and tries to connect
  //if it does not connect it starts an access point with the specified name
  //here  "AutoConnectAP"
  //and goes into a blocking loop awaiting configuration
  if(!wifiManager.autoConnect("esp8266 mischiantis test")) {
    Serial.println("failed to connect and hit timeout");
    //reset and try again, or maybe put it to deep sleep
    ESP.reset();
    delay(1000);
  }

  //if you get here you have connected to the WiFi
  Serial.println(F("WIFIManager connected!"));

  Serial.print(F("IP --> "));
  Serial.println(WiFi.localIP());
  Serial.print(F("GW --> "));
  Serial.println(WiFi.gatewayIP());
  Serial.print(F("SM --> "));
  Serial.println(WiFi.subnetMask());

  Serial.print(F("DNS 1 --> "));
  Serial.println(WiFi.dnsIP(0));

  Serial.print(F("DNS 2 --> "));
  Serial.println(WiFi.dnsIP(1));

}

void loop() {
  // put your main code here, to run repeatedly:

}
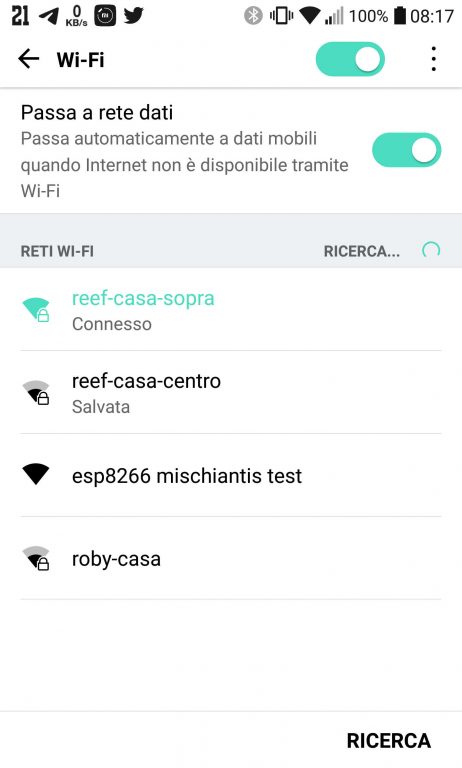
And than follow this steps
Select esp8266 mischiantis test
When you connect you are redirected automaticatty on 192.168.4.1 page:
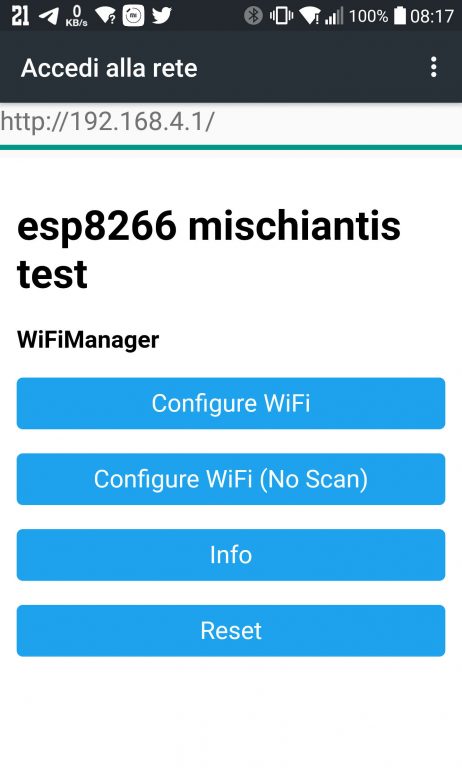
Here you can select Configure WiFi, and in the next page you can select your desidered Access Point.
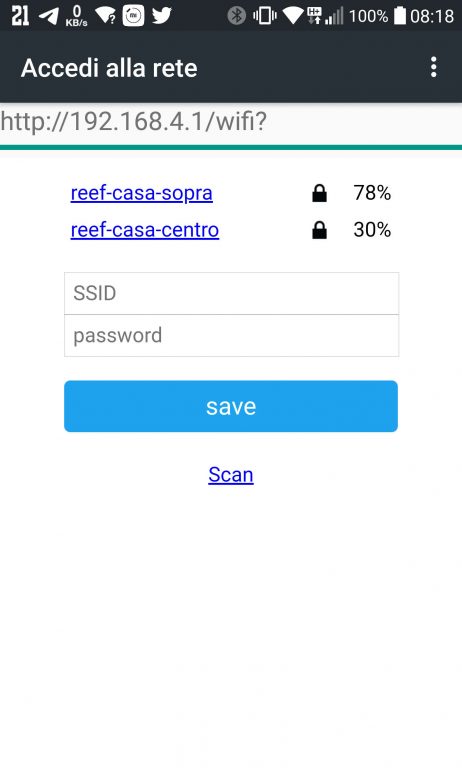
Than insert password and wait result page.

Now you are connected, you can see the result data on console:
*WM: AutoConnect
*WM: Connecting as wifi client...
*WM: Using last saved values, should be faster
*WM: Connection result:
*WM: 3
*WM: IP Address:
*WM: 192.168.1.101
WIFIManager connected!
IP --> 192.168.1.101
GW --> 192.168.1.1
SM --> 255.255.255.0
DNS 1 --> 85.37.17.12
DNS 2 --> 8.8.8.8
*WM: freeing allocated params!
Additional parameters
You can use the WiFiManager dynamic interface to add some parameter, here an example:
/*
 * Simple WiFiManager usage with additional parameter
 * https://mischianti.org/
 *
 * The MIT License (MIT)
 * written by Renzo Mischianti <www.mischianti.org>
 */

#include <ESP8266WiFi.h>

//needed for library
#include <DNSServer.h>
#include <ESP8266WebServer.h>
#include "WiFiManager.h"          //https://github.com/tzapu/WiFiManager

//define your default values here, if there are different values in config.json, they are overwritten.
char mqtt_server[40];
char mqtt_port[6] = "8080";
char blynk_token[34] = "YOUR_BLYNK_TOKEN";

void configModeCallback (WiFiManager *myWiFiManager) {
  Serial.println("Entered config mode");
  Serial.println(WiFi.softAPIP());
  //if you used auto generated SSID, print it
  Serial.println(myWiFiManager->getConfigPortalSSID());
}

void setup() {
  // put your setup code here, to run once:
  Serial.begin(115200);

  // The extra parameters to be configured (can be either global or just in the setup)
  // After connecting, parameter.getValue() will get you the configured value
  // id/name placeholder/prompt default length
  WiFiManagerParameter custom_mqtt_server("server", "Here a server IP", mqtt_server, 40);
  WiFiManagerParameter custom_mqtt_port("port", "Here a server port", mqtt_port, 6);
  WiFiManagerParameter custom_blynk_token("blynk", "Here a blynk token", blynk_token, 32);

  //WiFiManager
  //Local intialization. Once its business is done, there is no need to keep it around
  WiFiManager wifiManager;
  //reset settings - for testing
  //wifiManager.resetSettings();

  //set callback that gets called when connecting to previous WiFi fails, and enters Access Point mode
  wifiManager.setAPCallback(configModeCallback);

  //add all your parameters here
  wifiManager.addParameter(&custom_mqtt_server);
  wifiManager.addParameter(&custom_mqtt_port);
  wifiManager.addParameter(&custom_blynk_token);

  //fetches ssid and pass and tries to connect
  //if it does not connect it starts an access point with the specified name
  //here  "AutoConnectAP"
  //and goes into a blocking loop awaiting configuration
  if(!wifiManager.autoConnect("esp8266 mischiantis test")) {
    Serial.println("failed to connect and hit timeout");
    //reset and try again, or maybe put it to deep sleep
    ESP.reset();
    delay(1000);
  }

  //if you get here you have connected to the WiFi
  Serial.println(F("WIFIManager connected!"));

  Serial.print(F("IP --> "));
  Serial.println(WiFi.localIP());
  Serial.print(F("GW --> "));
  Serial.println(WiFi.gatewayIP());
  Serial.print(F("SM --> "));
  Serial.println(WiFi.subnetMask());

  Serial.print(F("DNS 1 --> "));
  Serial.println(WiFi.dnsIP(0));

  Serial.print(F("DNS 2 --> "));
  Serial.println(WiFi.dnsIP(1));

  //read updated parameters
  strcpy(mqtt_server, custom_mqtt_server.getValue());
  strcpy(mqtt_port, custom_mqtt_port.getValue());
  strcpy(blynk_token, custom_blynk_token.getValue());

  Serial.print(F("server --> "));
  Serial.println(mqtt_server);
  Serial.print(F("port --> "));
  Serial.println(mqtt_port);
  Serial.print(F("blynk --> "));
  Serial.println(blynk_token);

}

void loop() {
  // put your main code here, to run repeatedly:

}
the screen now show you the parameters
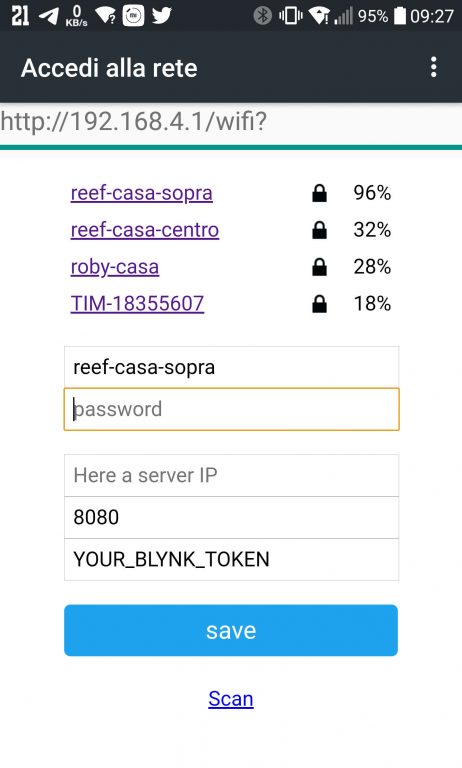
The console result show you the value inserted
*WM: AutoConnect
*WM: Connecting as wifi client...
*WM: Using last saved values, should be faster
*WM: Connection result:
*WM: 4
Entered config mode
192.168.4.1
esp8266 mischiantis test
*WM:
*WM: Configuring access point...
*WM: esp8266 mischiantis test
*WM: AP IP address:
*WM: 192.168.4.1
*WM: HTTP server started
*WM: Request redirected to captive portal
*WM: Request redirected to captive portal
*WM: Request redirected to captive portal
*WM: Request redirected to captive portal
*WM: Handle root
*WM: Request redirected to captive portal
*WM: Scan done
*WM: reef-casa-sopra
*WM: -61
*WM: reef-casa-centro
*WM: -82
*WM: Sent config page
*WM: Request redirected to captive portal
*WM: Request redirected to captive portal
*WM: Request redirected to captive portal
*WM: Request redirected to captive portal
*WM: WiFi save
*WM: Parameter
*WM: server
*WM: server.mischianti.org
*WM: Parameter
*WM: port
*WM: 8080
*WM: Parameter
*WM: blynk
*WM: YOUR_BLYNK_TOKEN
Static IP
You can define a Static IP also by adding this code before autoconnect call.
  IPAddress _ip = IPAddress(192, 168, 1, 10);
  IPAddress _gw = IPAddress(192, 168, 1, 1);
  IPAddress _sn = IPAddress(255, 255, 255, 0);

  wifiManager.setSTAStaticIPConfig(_ip, _gw, _sn);
Thanks
This is a very usefully library, but sometime must change some part of code to fit on your project.
To manage the DNS server to permit to the device to connect on remote server I must change some code, you can find my version here.
wifiManager.setSTAStaticIPConfig(_ip, _gw, _sn, _dns1, _dns2);