
ESP32: integrated SPIFFS FileSystem – Part 2
We continue to explore e32 devices, very powerful microcontroller.
You can find It here ESP32 Dev Kit v1 - TTGO T-Display 1.14 ESP32 - NodeMCU V3 V2 ESP8266 Lolin32 - NodeMCU ESP-32S - WeMos Lolin32 - WeMos Lolin32 mini - ESP32-CAM programmer - ESP32-CAM bundle - ESP32-WROOM-32 - ESP32-S
SPI Flash File System (SPIFFS)
Serial Peripheral Interface Flash File System, or SPIFFS for short. It’s a light-weight file system for microcontrollers with an SPI flash chip. The on-board flash chip of the ESP8266 has plenty of space for your files.
Standard version (dev kit) of esp32 have 4Mb of flash and you can use since 3Mb of that for your file.
SPIFFS let’s you access the flash memory as if it was a normal file system like the one on your computer (but much simpler of course): you can read and write files, create folders etc.
In this flash memory ESP stores the program. Along with program you can store your files on it. Limitation of this memory is it has only 10000 (ten thousand) write cycles.
Add file from IDE to SPIFFS
This operation without an extension for the Arduino IDE is not so simple, but here we are going to explain the simpliest way.
First you must download the plugin for Arduino IDE here.
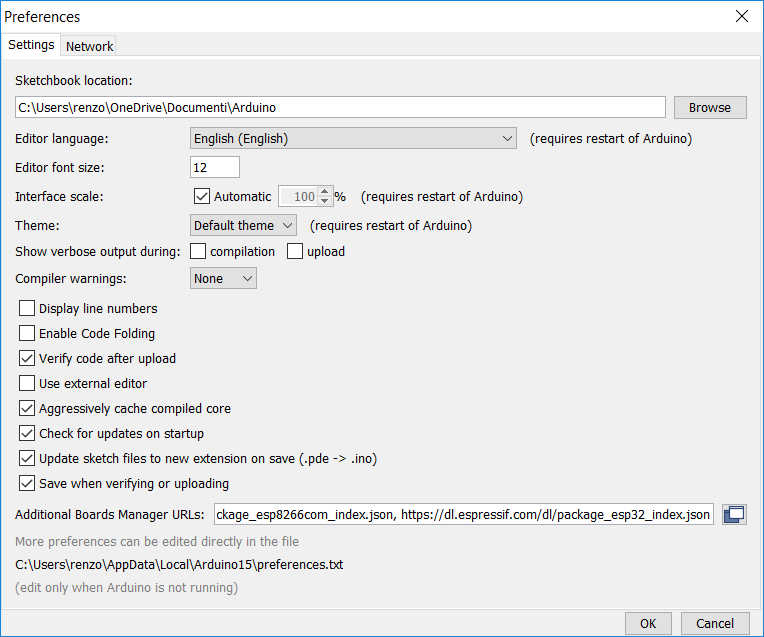
Than you must find your Shetckbook folder, so you must go to File --> Preferences, in that screen you can find at the top of window the Sketchbook location.
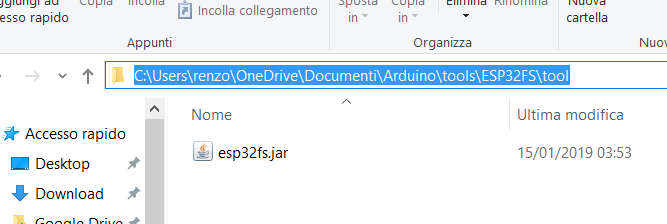
Now you must create (if not exist) the folder tools\ESP32FS\tool and add the jar file esp32fs.jar there.
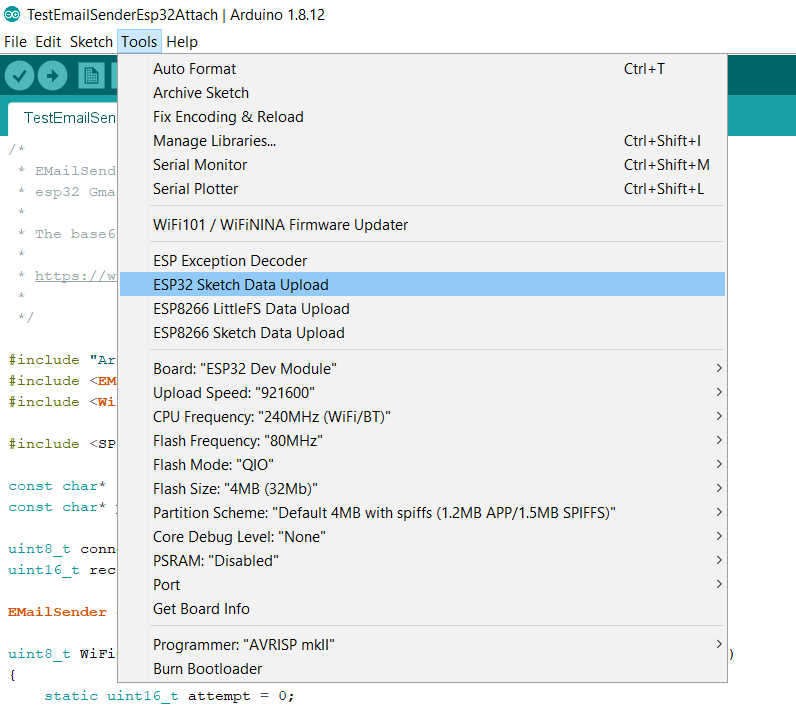
Now restart the IDE and on Tools menu you can find new menu line ESP32 Sketch Data Upload.
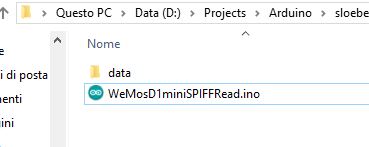
On Arduino IDE do Ctrl+K to open a filebrowser on directory of the sketch.
Create a directory data where you are going to put the data you want to upload.
Set the size of SPIFFS on Tools --> Flash size and set the size of your Microcontroller SPIFFS.
Upload your sketch, and than click on ESP32 Sketch Data Upload.
Now go to the example sketch to check if all is OK.
Commands
There are some standard command that you can use with this filesystem
SPIFFS.begin()
This method mounts SPIFFS file system and It must be called before any other FS APIs are used. Returns true if file system was mounted successfully, false otherwise.
SPIFFS.format()
Formats the file system. Returns true if formatting was successful.
SPIFFS.open(path, mode)
Opens a file. path should be an absolute path starting with a slash (e.g. /dir/filename.txt). mode is a string specifying access mode. It can be one of “r”, “w”, “a”. Meaning of these modes is the same as for fopen C function.
Returns File object. To check whether the file was opened successfully, use the boolean operator.
SPIFFS.exists(path)
Returns true if a file with given path exists, false otherwise.
SPIFFS.remove(path): Deletes the file given its absolute path. Returns true if file was deleted successfully.
SPIFFS.rename(pathFrom, pathTo)
Renames file from pathFrom to pathTo. Paths must be absolute. Returns true if file was renamed successfully.
SPIFFS.totalBytes()
Return the total bytes enabled on SPIFFS. Returns bytes.
SPIFFS.usedBytes()
Return the total used bytes enabled on SPIFFS. Returns bytes.
file.seek(offset, mode)
This function behaves like fseek C function. Depending on the value of mode, it moves current position in a file as follows:
- if mode is SeekSet, position is set to offset bytes from the beginning.
- if mode is SeekCur, current position is moved by offset bytes.
- if mode is SeekEnd, position is set to offset bytes from the end of the file.
- Returns true if position was set successfully.
file.position()
Returns the current position inside the file, in bytes.
file.size()
Returns file size, in bytes.
file.name()
Returns file name, as const char*.
file.close()
Close the file.
file.getLastWrite()
Epoch time of last write (use internal time to manage date).
Pratical examples
Here a sketch to get info and check all file in your SPIFFS.
/*
 *  ESP32
 *  SPIFFS get info, read dir and show all file uploaded
 *  add a data folder to use with ESP32 Sketch data uploader
 *  by Mischianti Renzo <https://mischianti.org>
 *
 *  https://mischianti.org
 *
 */

#include "Arduino.h"
#include "SPIFFS.h"

void printDirectory(File dir, int numTabs = 3);

void setup()
{
	Serial.begin(115200);

	delay(500);

	Serial.println(F("Inizializing FS..."));
	if (SPIFFS.begin()){
		Serial.println(F("done."));
	}else{
		Serial.println(F("fail."));
	}

	// To format all space in SPIFFS
	// SPIFFS.format()

	// Get all information of your SPIFFS

	unsigned int totalBytes = SPIFFS.totalBytes();
	unsigned int usedBytes = SPIFFS.usedBytes();

	Serial.println("File sistem info.");

	Serial.print("Total space:      ");
	Serial.print(totalBytes);
	Serial.println("byte");

	Serial.print("Total space used: ");
	Serial.print(usedBytes);
	Serial.println("byte");

	Serial.println();

	// Open dir folder
	File dir = SPIFFS.open("/");
	// Cycle all the content
	printDirectory(dir);
}

void loop()
{

}

void printDirectory(File dir, int numTabs) {
  while (true) {

    File entry =  dir.openNextFile();
    if (! entry) {
      // no more files
      break;
    }
    for (uint8_t i = 0; i < numTabs; i++) {
      Serial.print('\t');
    }
    Serial.print(entry.name());
    if (entry.isDirectory()) {
      Serial.println("/");
      printDirectory(entry, numTabs + 1);
    } else {
      // files have sizes, directories do not
      Serial.print("\t\t");
      Serial.println(entry.size(), DEC);
    }
    entry.close();
  }
}
Here a sketch with more pratical commands, write a string in a file, read all file content, positioning on the 9 byte of the file and read from there the data.
/*
 *  ESP32
 *  SPIFFS write, read and seek file
 *  by Mischianti Renzo <https://mischianti.org>
 *
 *  https://mischianti.org/
 *
 */
#include "Arduino.h"
#include "SPIFFS.h"

void setup()
{
	Serial.begin(115200);

	delay(500);

	Serial.println(F("Inizializing FS..."));
	if (SPIFFS.begin()){
		Serial.println(F("done."));
	}else{
		Serial.println(F("fail."));
	}

	// To remove previous test
	// SPIFFS.remove(F("/testCreate.txt"));

	File testFile = SPIFFS.open(F("/testCreate.txt"), "w");

	if (testFile){
		Serial.println("Write file content!");
		testFile.print("Here the test text!!");

		testFile.close();
	}else{
		Serial.println("Problem on create file!");
	}

	testFile = SPIFFS.open(F("/testCreate.txt"), "r");
	if (testFile){
		Serial.println("Read file content!");
		/**
		 * File derivate from Stream so you can use all Stream method
		 * readBytes, findUntil, parseInt, println etc
		 */
		Serial.println(testFile.readString());
		testFile.close();
	}else{
		Serial.println("Problem on read file!");
	}

	testFile = SPIFFS.open(F("/testCreate.txt"), "r");
	if (testFile){
		/**
		 * mode is SeekSet, position is set to offset bytes from the beginning.
		 * mode is SeekCur, current position is moved by offset bytes.
		 * mode is SeekEnd, position is set to offset bytes from the end of the file.
		 * Returns true if position was set successfully.
		 */
		Serial.println("Position inside the file at 9 byte!");
		testFile.seek(9, SeekSet);

		Serial.println("Read file content!");
		Serial.println(testFile.readString());
		testFile.close();
	}else{
		Serial.println("Problem on read file!");
	}


}

void loop()
{

}
Thanks
- ESP32: pinout, specs and Arduino IDE configuration
- ESP32: integrated SPIFFS Filesystem
- ESP32: manage multiple Serial and logging
- ESP32 practical power saving
- ESP32 practical power saving: manage WiFi and CPU
- ESP32 practical power saving: modem and light sleep
- ESP32 practical power saving: deep sleep and hibernation
- ESP32 practical power saving: preserve data, timer and touch wake up
- ESP32 practical power saving: external and ULP wake up
- ESP32 practical power saving: UART and GPIO wake up
- ESP32: integrated LittleFS FileSystem
- ESP32: integrated FFat (Fat/exFAT) FileSystem
- ESP32-wroom-32
- ESP32-CAM
- ESP32: use ethernet w5500 with plain (HTTP) and SSL (HTTPS)
- ESP32: use ethernet enc28j60 with plain (HTTP) and SSL (HTTPS)
- How to use SD card with esp32
- esp32 and esp8266: FAT filesystem on external SPI flash memory
- Firmware and OTA update management
- Firmware management
- OTA update with Arduino IDE
- OTA update with Web Browser
- Self OTA uptate from HTTP server
- Non-standard Firmware update
- Integrating LAN8720 with ESP32 for Ethernet Connectivity with plain (HTTP) and SSL (HTTPS)
- Connecting the EByte E70 to ESP32 c3/s3 devices and a simple sketch example
- ESP32-C3: pinout, specs and Arduino IDE configuration


